Bonjour, Paris! (A fast, easy, cheap little makeover)

Standard

When I saw a small ottoman/upholstered footstool for sale for $5, all wood with padding and plywood intact…I pounced! There’s no limit to what could be done with it. It’s funny to me that the makeover ended up being neutral, demure, and sophisticated rather than vibrant, bright, and fun.


I’m fairly certain the culprit is “The Other Boleyn Girl”, which I am currently re-reading for the fourth time. Maybe it’s the sense of artistocracy, Anne’s French sense of fashion, or the courtly revels, but I’ve had Paris on the brain today.


I decided I wanted to budget between $8-$10 total for the project, including the ottoman and supplies.


Well, $3 in fabric later (I had also bought a burlap fabric, but it didn’t “fit” as well as this cotton twill), leftover chalk paint and paint supplies later, and I had my final result!

I used a bit of semi-gloss water-based floor poly to seal the chalk paint, which I distressed using an old sanding block. When keeping project costs down, GO SHOPPING IN YOUR OWN HOUSE.


Seriously…it’s the best way to do it! And chalk paint is environmentally friendly, non-toxic, and safe, so it’s a good choice for virtually anyone. Roughing it up is a lot of fun, and you can play around with it to achieve your desired result.

I did one good coat of oatmeal colored chalk paint and then roughed it up.


Here is what I started with:

Image

Bad fabric, bad color (it did not know whether to be maple or mahogany). However, good bones!

Here’s the frame after paint and before distressing:

Image


And the final results:ImageImageImageImageImageImage

(That last photo, with the flash on, highlights the distressing).

I fell in love with that fabric straight away…old bikes, skeleton keys, French script, the Eiffel Tower? AND cheap? Sign me up! It is a cotton twill, as previously mentioned, not heavy tapestry or thick fabric, but it works perfectly on this piece. I’ll use my $2 piece of Parisian burlap for another project in the future.


So to recap costs:

Footstool/ottoman: $5

Parisian fabric: $3

Leftover paint, brushes, poly, sanding block: FREE 🙂

Project total: $8


Here it is in its new home, next to a fabulous $15 overstuffed chair that I got on Craigslist last summer. The butterfly pillow is from Pier 1 and features French script that pairs nicely with the ottoman.

IMG_1568

Can’t beat that, can you?

Image

Image


Until next time 😉

Advertisement

Somewhere Under the Rainbow (and over the bulkhead)

Standard

Ho-kay! So…

I won’t even mince words. I have done a LOT of cool things to my house since I bought it in 2013. I’m not sure why this little, silly, eccentric change is such a big deal to me, but it is! Like all great ideas, it began as a tiny ghost of a thought that snowballed and spiraled into something totally different…and far more wonderful.

The original plan was a pallet wall in the half bath, with rustic, unfinished wood. Then, I thought that maybe I should also put the pallet wood on the bulkhead where the main pipe is stored in the ceiling. Then I got to thinking I could salvage some of the pallet planks and paint them bright rainbow colors on the bulkhead. THEN, after taking the idea to my husband, he suggested scrapping the pallet wood and going for a more streamlined look with 1 x 2’s painted and placed together.

I’ve always been in love with (and truth be told, kind of obsessed with) rainbows. What’s not to love?! I am a colorful person, I love color in my house, I love all the things rainbows mean and stand for, and they simply make me happy. Once the idea of having my own, personal rainbow in my own home took hold in my mind, I couldn’t let it go.

I searched high and low, but could not find any photos of exactly what I wanted or planned on doing. Either it hasn’t been done or (more likely) simply hasn’t been posted. But this little bulkhead was the perfect place for a small but brilliant makeover. I decided early on to follow the ROYGBV color scheme, but after hubby had measured the bulkhead, he said that to sit the colors/lumber boards all up against one another, it was going to require 8 colors! After some thought (and a lot of mixing of paint), I decided to add a terra-cotta color after the red (that matched the half-bath perfectly) and a cross between robin’s egg blue and turquoise after green, for a total of 8 colors. Because the boards were pre-primed, my job was easy! I bought acrylic paints rather than latex for this project. The hardest part was spending the time to mix colors to make them exactly, perfectly “right”.

Here’s the top half of the rainbow being painted:

ImageImage

And the top half of the rainbow all finished:

Image

::warm fuzzies::

(Looks like a sunset!)

Then, it came time to begin the bottom half:

Image

(that was after coat 1)

After a few other coats, here is the whole rainbow assembled together:

Image

Now, let’s play “spot the problem”.

SEE THAT GREEN?! EEK. Way too dark! After several tries mixing to get the color I was going for:

Image

That’s more like it!

Once more, here it is with all of the finalized colors:

Image


And ::drumroll, please:: Here is the completed accent wall, up on the bulkhead in the half-bath.

Image

Image


I realize that to a lot of people, I am the layman’s term for “crazy”. However, I love my rainbow accent wall and I love that I have my own rainbow at home.

One of the best parts? Between materials and paint, the whole cost of the accent wall was a mere $15! If this isn’t $15 of fun, I don’t know what is 🙂

Save the popcorn for the theater!

Standard

The following entry is NOT by me 🙂 It was (wonderfully) done by my lovely husband, Jeff, for instructables.com.

This is the original link: http://www.instructables.com/id/Removing-Popcorn-Ceilings/

I am posting it here because I love the difference it has made in our home. I came home from a bad day at work to the surprise of a new project for our house. Some girls like flowers, cards, and jewelry….I like home projects (and getting a little messy in the process). Next up is our 400 square-foot den, which will prove more of a challenge.

Here I am, covered in plaster after night #1 of “popcorngate”:

plaster

Without further ado, please join me in saying so-long to the popcorn ceilings in the foyer, dining room, and formal living room. Let’s leave the popcorn in the bag or the bowl, where it belongs!

Picture of Removing Popcorn Ceilings!
IMG_2795.JPG
IMG_2998.JPG
IMG_2802.JPG
sprayer.JPG
IMG_2808.JPG
IMG_2805.JPG
IMG_2817.JPG
IMG_2815.JPG
IMG_2820.JPG
IMG_2828.JPG
IMG_2834.JPG
IMG_2870.JPG
IMG_2836.JPG
IMG_2869.JPG
IMG_2884.JPG
IMG_2883.JPG
IMG_2993.JPG
IMG_2842.JPG
IMG_2838.JPG
Untitled-1.jpg
IMG_2874.JPG
IMG_2885.JPG
IMG_3004.JPG
IMG_2936.JPG
IMG_2938.PNG
IMG_2939.JPG
IMG_2940.JPG
IMG_2944.JPG
IMG_2953.JPG
IMG_2956.JPG
IMG_2985.JPG
IMG_2988.JPG
IMG_2990.JPG
IMG_2991.JPG
IMG_2997.JPG
I surprised my wife by having her walk in from a long day at work to find me covered in sloppy wet oatmeal-like popcorn ceiling plaster and the furniture all over the house, but she wasn’t mad and it turned out to be a very easy DIY project!***((Warning: Popcorn applied before 1978 MUST BE TESTED for asbestos and other chemicals common to the product in the 60’s/70’s.  You do NOT want those fibers floating around the room to be ingested.  If it’s asbestos based, you should have a professional come in to take care of it.  Some municipalities have codes against you doing it yourself, for safety reasons.))***Popcorn ceilings were really popular back in the day, although many people had them sprayed on to hide defects in the ceiling, supposedly-deaden sound, or give that “cozy” appearance to a room that was a little too barren.  Either way, I don’t believe that have any place in a modern home, and must be removed immediately!Ours was actually sprayed circa 2001, so it came off fairly easily and the ceiling drywall was already primed white above it, making it even more easy.  Many times, you’ll find cracked Sheetrock, failed joint compound, edging tape coming loose etc.  If any cracks are apparent, moistening some joint tape before applying to the crack, then compound over it until it’s smooth. It’s the best remedy – short of installing new drywall!Anyway, the process is simple.

Supplies list: (many of these items you may already own, keeping costs down)

Clear Tarps ($10)
Duct Tape ($5)
Blue Painter’s tape ($5)
Handheld pump sprayer ($15)
Bucket, Sponge and Soap ($15)
10″ Scraper ($7)
Silicone Caulk – ($4)
Stepstool ($25?)
Paint Pole, Roller, and Roller Covers ($15)
Ceiling Paint ($15 / gallon)
Spackle / Joint Compound ($5)
Sandpaper ($5)
Mask / Respirator ($15)
Joint Tape ($3)

Instructions:

1) Strip room of everything you can move.  Certain sofas, tv stands, or heavy furniture are better off left where they sit, but all lamps etc. can go. It’s much easier to get to all corners with big things missing.

2) Tarp the entire room.  Tape tarps together – ALL SEAMS- with duct tape, and use the painter’s tape to go at least a foot up the walls.  Cover all electrical outlets and air registers, essentially creating a bowl-shape for the plaster to fall in to.  Some people like to tarp the ENTIRE walls, but if you go slow, not much will glop onto them.  It’s easy to clean up later anyway.  The smallest seam between tarps will inadvertently cover the entire room in plaster dust.

2) Use the water sprayer to moisten a 5×5 foot box shape.  You can spray the whole room if you want, but this stuff absorbs a ridiculous amount of water, so be aware before you begin.  It’s hard to describe when it’s wet enough – but your scraper will slide through the “oatmeal” easily without leaving the Sheetrock very wet behind it.  You can use paper towels to dry the Sheetrock if it’s really wet, and be sure to spray the popcorn directly.  If you have many drips falling from the ceiling, it’s more than wet enough.  You can honestly use your fingernails to test!  Wear a mask and eye protection, even if you’re asbestos free.  This stuff tastes like glue.

3) Use a file to smooth and curve the edges of your scraper so you don’t gauge the Sheetrock above the popcorn.  This step isn’t necessary, but I’m glad I did!  You could use a smaller (or larger) width scraper, but the 10″ was perfect for our application.

4) Get up on your stool and scrape away!  Hold the scraper at a very low angle – almost parallel with the ceiling.  The more angle, the more gouges you’ll risk.  Push firmly, but if it fights you, add more water.  Water is your friend!  You can also use a paint roller dipped in warm water to apply if you don’t have a pump sprayer. You CAN scrape dry popcorn, but it’s a lot more work.

5) Be sure to keep all the oatmeal on your tarps, but be warned – it will be MESSY and SLIPPERY.  I wore “crocs” type shoes to keep from stepping in it directly, and they’re easy to wash off.  As the wet oatmeal dries, it turns back into a powder, which will get everywhere.  Be sure to double tape your tarp seams.

6) Use a smaller putty knife to get the edges.  If your room has molding, scrape against it.  If not molding exists, scrape close, then use the sandpaper to get the edges.  You may need a gritty sandpaper to get it done.  Remember: water is your friend!

7) Bundle all tarps into themselves, overlapping, to keep major chunks from falling out.  We did a poor job taping the seams, so dust and chunks got everywhere.  On treated hardwood floors, a warm water bucket with citrus cleaner will do a nice job, and a shop-vacuum (wet / dry vac) gets the dust.  It’s a good reason to move the furniture and clean behind!

8) Check for any repairs.  We didn’t have much major repairs, but Spackle easily fills in the holes.  Wait for it to dry, sand it flat and prime/paint over it.  Use the sandpaper to smooth out any missed plaster or adhesive.  Remember your mask and goggles…  Use a damp (not wet) sponge and paper towels to wipe the ceilings smooth. Paint will not adhere to loose drywall dust!

9) Prime and Paint – Apply fresh tarps, no need to tape unless you feel so inclined.  You may need 1/2 coats of primer if you’re painting plain stamped drywall, or if you’re using any other color other than white.  I used the primer that was already applied, and put two heavy coats of ceiling paint on top.  The paint roller pole was a little difficult to get used to, but applying a lot of pressure made the process go quickly.  Wait for the coat to dry completely before “touching up” any areas.  Ceiling paint is usually flat, and wet spots will look a bit awkward until it fully dries.

10) You may want to use a silicone caulk to clean up the edges where the ceiling meets the walls.  In our application, our walls are actually painted-over wallpaper, so the edges were very rough.  They may have applied an adhesive to the edges to keep the wet popcorn from peeling the paper during installation.

11) Throw away all tarps, examine progress for touch-ups, missed spots etc.

12) Clean and replace!  Use the water bucket and mop, as well as a vaccum and dusting rag to give your rooms a really good clean.  If you get plaster on carpet, use it as a reason to rip up all the carpet! 😀  You may have to vaccuum 47 times, wipe the glass 12 times and mop 125 times, but in the end it’s worth it.  The hard part is over now.

13) If you’re replacing fixtures, fans etc, remember to remove the old ones first.  Turn off the electricity at the circuit breaker and flip the wall switch off for extra insurance.  If you’re not comfortable with the wiring, seek professional assistance.  Do not spray this plaster with water, just grab some gritty sandpaper and get it done.  No water should come anywhere near electrics, even with it shut off at the circuit breaker.

And that’s it!  Obviously, tall or angled ceiling would be more difficult but for the cost, it’s a great thing to try yourself.

You’ll notice a LOT more light in each room, now that the millions of tiny shadows are gone, and you’ll insist your ceilings are a foot taller than they used to be.

Total times for 2 rooms and a hallway:

Wet, Scrape, Spackle = 2 Hours
Prime / Paint = 2-3 Hours
Cleanup / Replace = 2 Hours

Good luck and have fun!  Be sure to blast music and invite friends over to help.  It may not be perfect, but our motto became ‘anything’s better than popcorn!” and for us, that’s true.  😀

A Touch of Retro (Paging the 1950’s!)

Standard

Hello, my precious little blog! I’ve missed this place. I’ve also missed having, you know…a life.

I’m always really inspired in the summertime, when I’ve got vacations on the brain and plenty of time to myself to get creative!

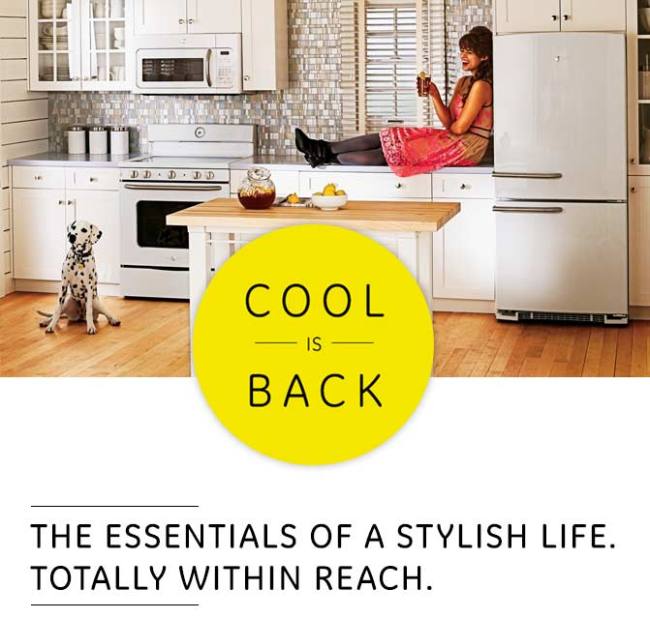
In the interest of beating the wintertime blues (as NJ has spontaneously morphed into an offshoot of Antarctica), I want to talk retro, I want to talk kitchens, and I want to talk 1950′s design elements. *cue Julie Andrews singing “My Favorite Things”*

They say style is cyclical. “They” are right! It seems that every number of years, things come back into vogue again. Maybe it’s just me, but I feel I am seeing this constantly with the 1950′s! ESPECIALLY when it comes to kitchens, so much of what is popular right now harkens back to this time period. I super-love the decor/design of the 50′s…from fashion to home design. I also have to say that while I did not set out or plan to add some 1950′s elements to my kitchen during the remodel, it definitely ended up that way.

Let’s go back in time a bit. I’m going to show you some ads and photos of 50′s kitchens so we have a baseline to work with:

Image

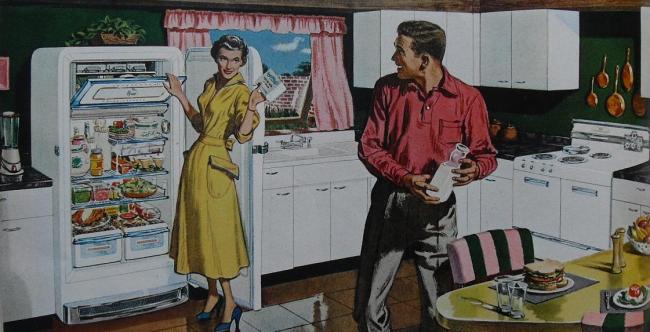
Ahhh yes, the 50′s “kitchenbitch”. A true classic. What I find intriguing is the crisp, white look. This kitchen would not look out-of-place in a kitchen today!

Image

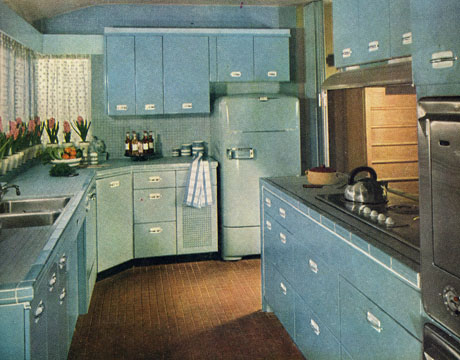
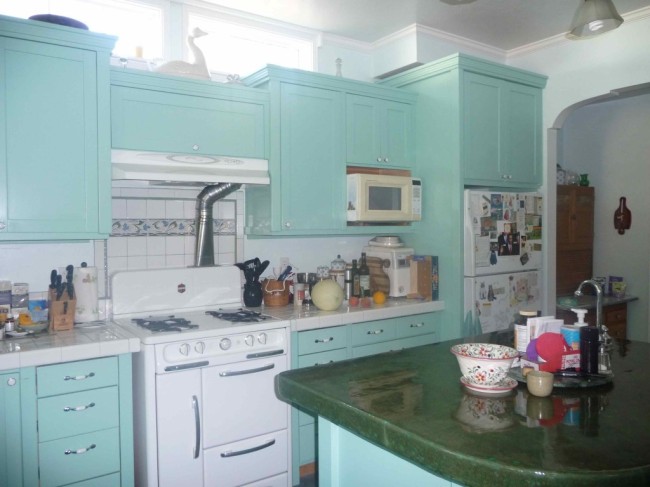
I can’t tell you enough how much I adore this kitchen. the 50′s saw the rise of metal cabinets in fun colors, such as this Tiffany blue. The fridge just brings it all together. Look on the right and you’ll see the awesome stainless steel wall ovens…which are highly desirable right now.

Image

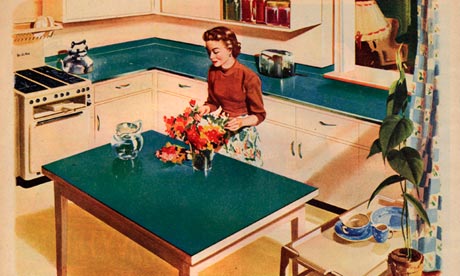
Another “white cabinet” kitchen….this time with tea/green formica counters and an island *very trendy back then*.

Image

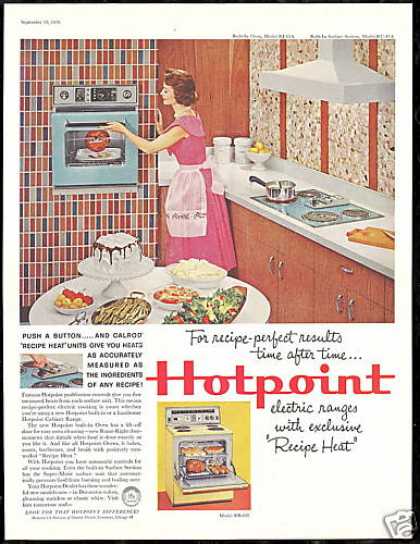
50′s “Hotpoint” ad featuring their colorful wall oven. My obsession with the color aside, they are coming back in popularity. Notice something else? Check out the mosaic wall design. Flip the pattern horizontally and you have today’s tile backsplash. I always fly into an unnecessary rage when people buy an old kitchen with an awesome old wall oven and then RIP IT OUT. WHY?!

Image

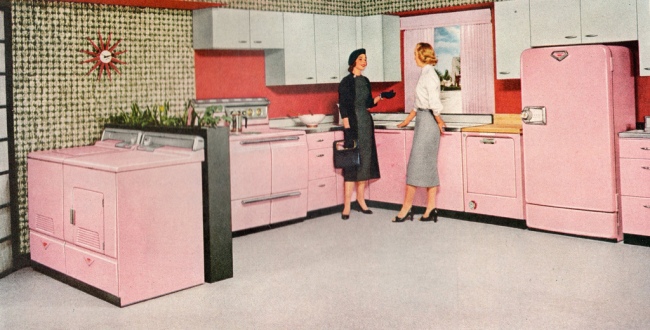
1950′s “pepto pink”. A true classic. Also popular in bathrooms and tile. Hey, this was the housewife’s domain, and if she wanted a pink kitchen, she got one!

Image

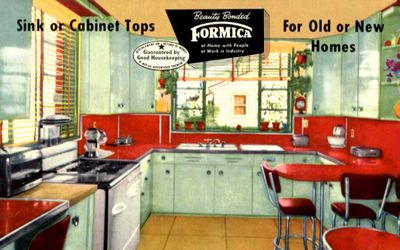
This is an old Formica ad. It was the fashionable thing to have. Formica actually grew to NOT be a trend, as it was the go-to material for countertops for 50+ years! Today, most people want natural stone or some form of cement/silestone. What I also think is fun about the ad is that it features the great “retro red” pop of color so popular in this day (carried over from the 40′s).

Image

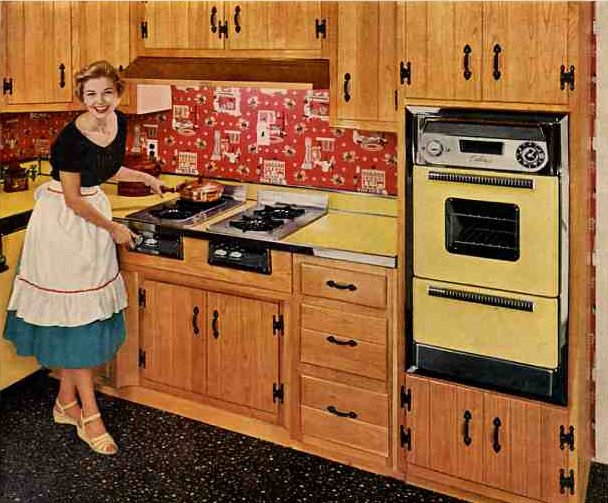
Changing gears, this ad focuses on yellow accents (Formica and wall oven) but features wood cabinets with the classic 50′s hinges and hardware. Sweet wallpaper, no? *yikes*

When you really start to examine the photos, you can’t help but see eerie similarities to what is trending today! Every decade has its moment in the proverbial sun and its own particular nostalgia. However, something about the 50′s seem a little more lasting (and somehow still relevant).

Fast forward to 2014: A kitchen remodel is the most expensive (and sought after) home renovation. The trouble is that they’re so costly! To completely rebuilt a basic kitchen will easily cost you $30,000. A remodel on the higher end usually tops $50,000. I’ve discussed kitchens a few times before.This entry is more for those who don’t WANT to spend a small fortune, but if you’ve got a big budget, you can work with this information, too!

If you want something other than beige granite, stainless steel appliances, travertine backsplash, and darker wood cabinets…consider bringing one or more 50′s elements into your kitchen! You can do it in a big way or do it in a more subtle fashion. I personally feel it’s the most fun with color added, but hey…your call.

Whether you bought an older home and are working with what you have, or want your newer kitchen to travel back in time, here are some awesome renovated kitchens with elements borrowed from the 50′s:

Image

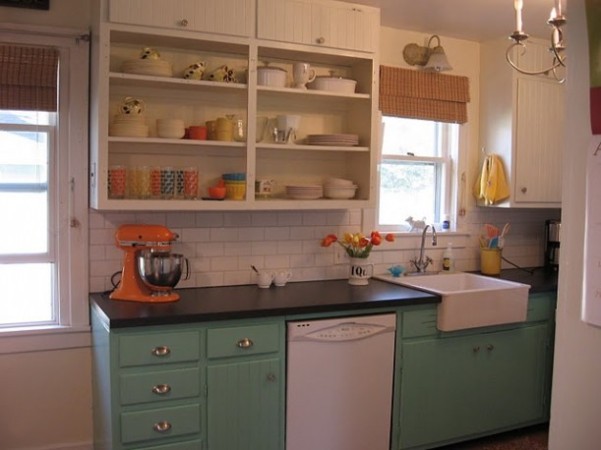
The above kitchen is the stuff of my vintage fantasies! I love the painted cabinets, the hardware, the apron sink, and the removed cabinets on top to make room for open shelving that houses fun, colorful accents. The white subway tile backsplash keeps it simple but fits perfectly, and the white appliances are a perfect choice here. How much fun is that orange Kitchenaid?! These people get an A+++ from me! They took an older kitchen and redid it in a way that stays true to the era but *belongs* today, too.

Image

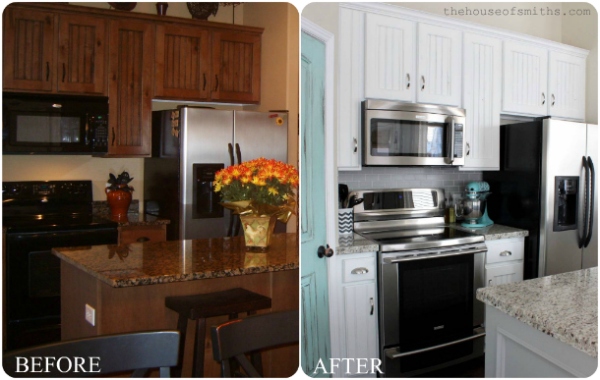
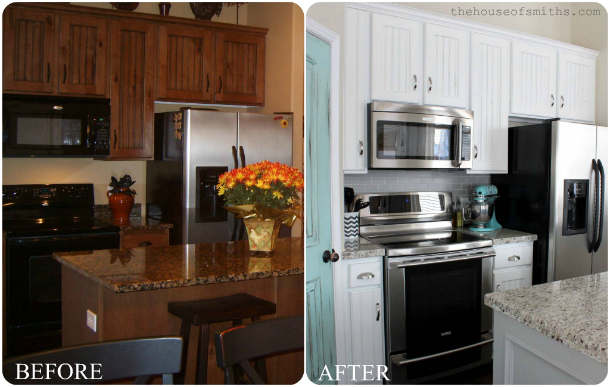
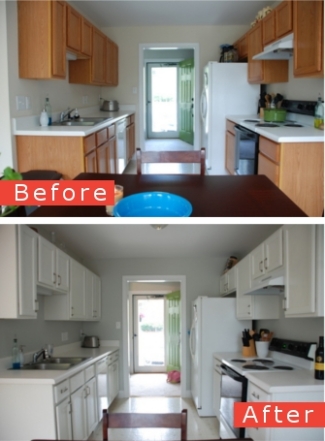
Now, you may notice that the “before” photo is the “everykitchen” that is sought after today. It’s tasteful, it’s pretty, but it’s also rather anonymous. I love these people for their excellent and MUCH more fun “re-vamp”! They added shiny new stainless appliances (which are somehow a perfect modern-retro marriage), painted the cabinets white, chanegd the hardware to stainless steel, and (my favorite change), chalk-and-distress painted their pantry door. GENIUS! Perfect vintage touch! What is striking is how different the granite looks after the re-do…it’s the same counter-top, but the white, bright remodel changes its look.

Image

Talk about preservation! These homeowners did a gorgeous job preserving the style and integrity of their 50′s kitchen while still creating something stylish and relevant. They kept and painted their original hardware and exposed hinges. They painted the original wood cabinets off-white. They kept their still-working wall ovens and old gas cooktop. The scallop details that frame the window are pretty and unique. The best thing they did was paint their old counters to an awesome matte black that “fits” perfectly. A re-vamp like this costs nearly nothing!

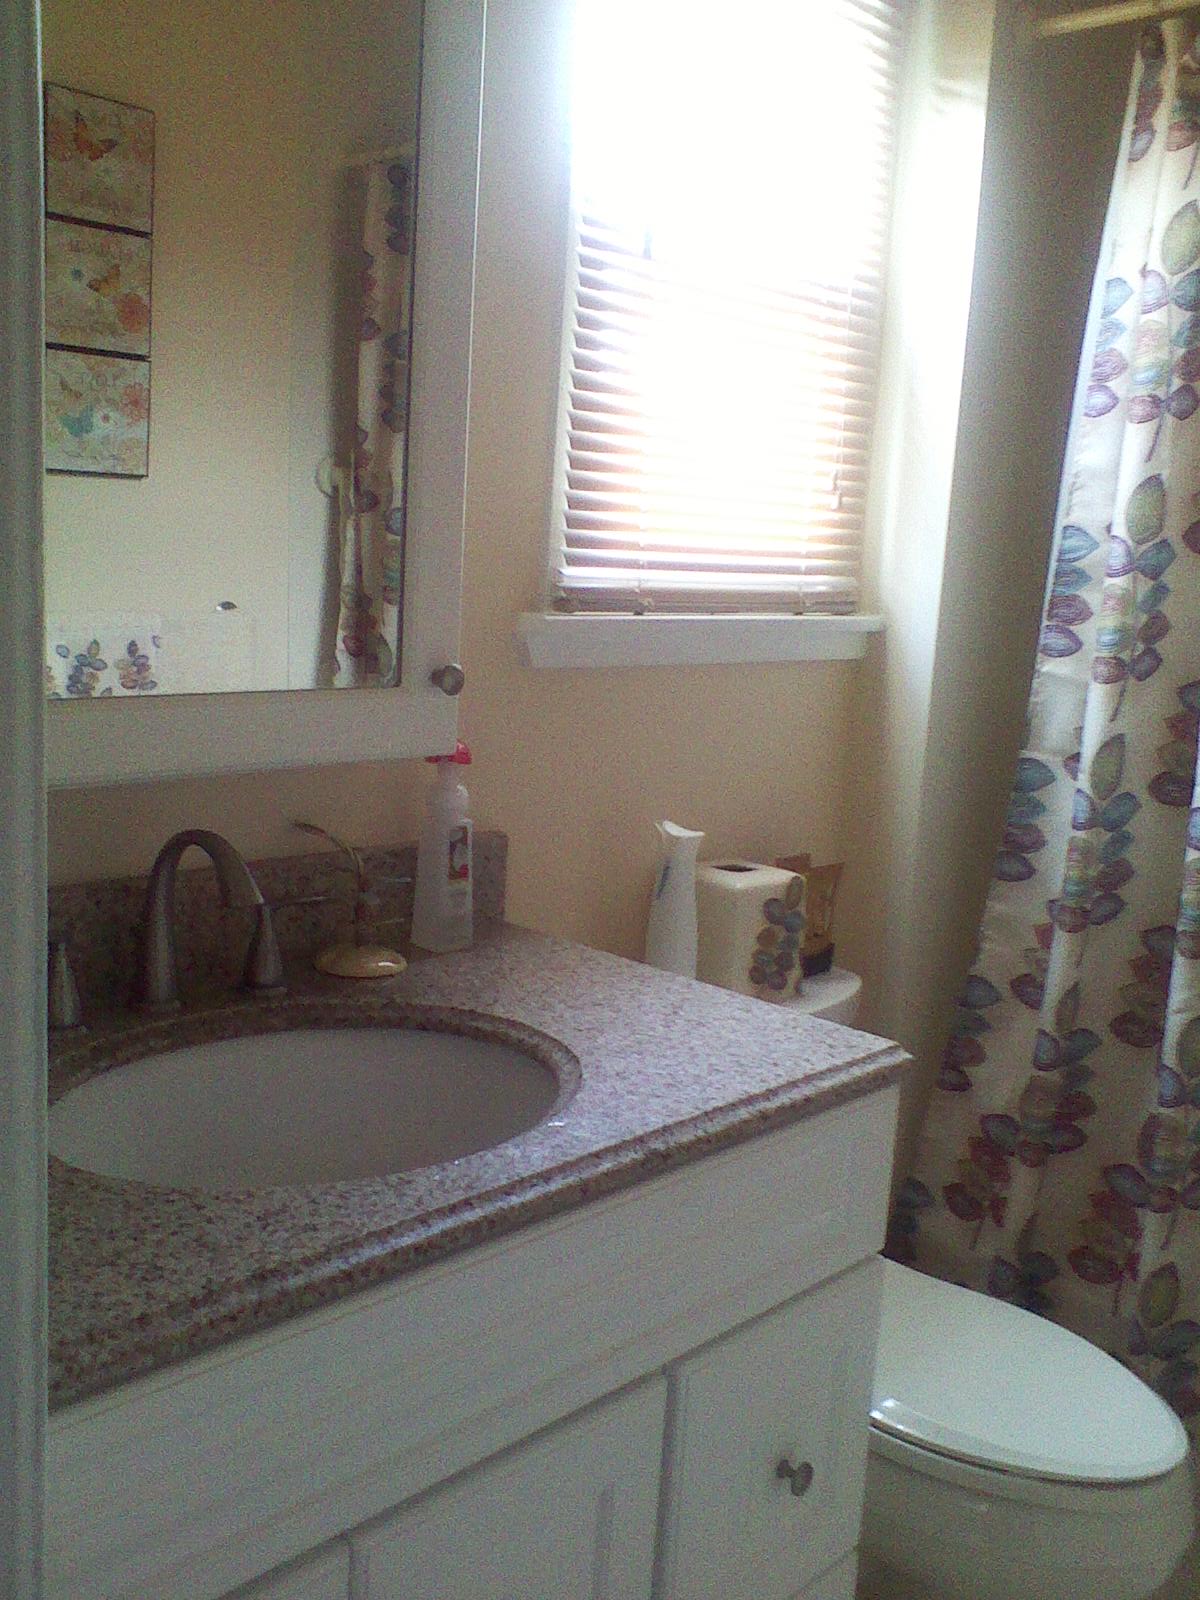
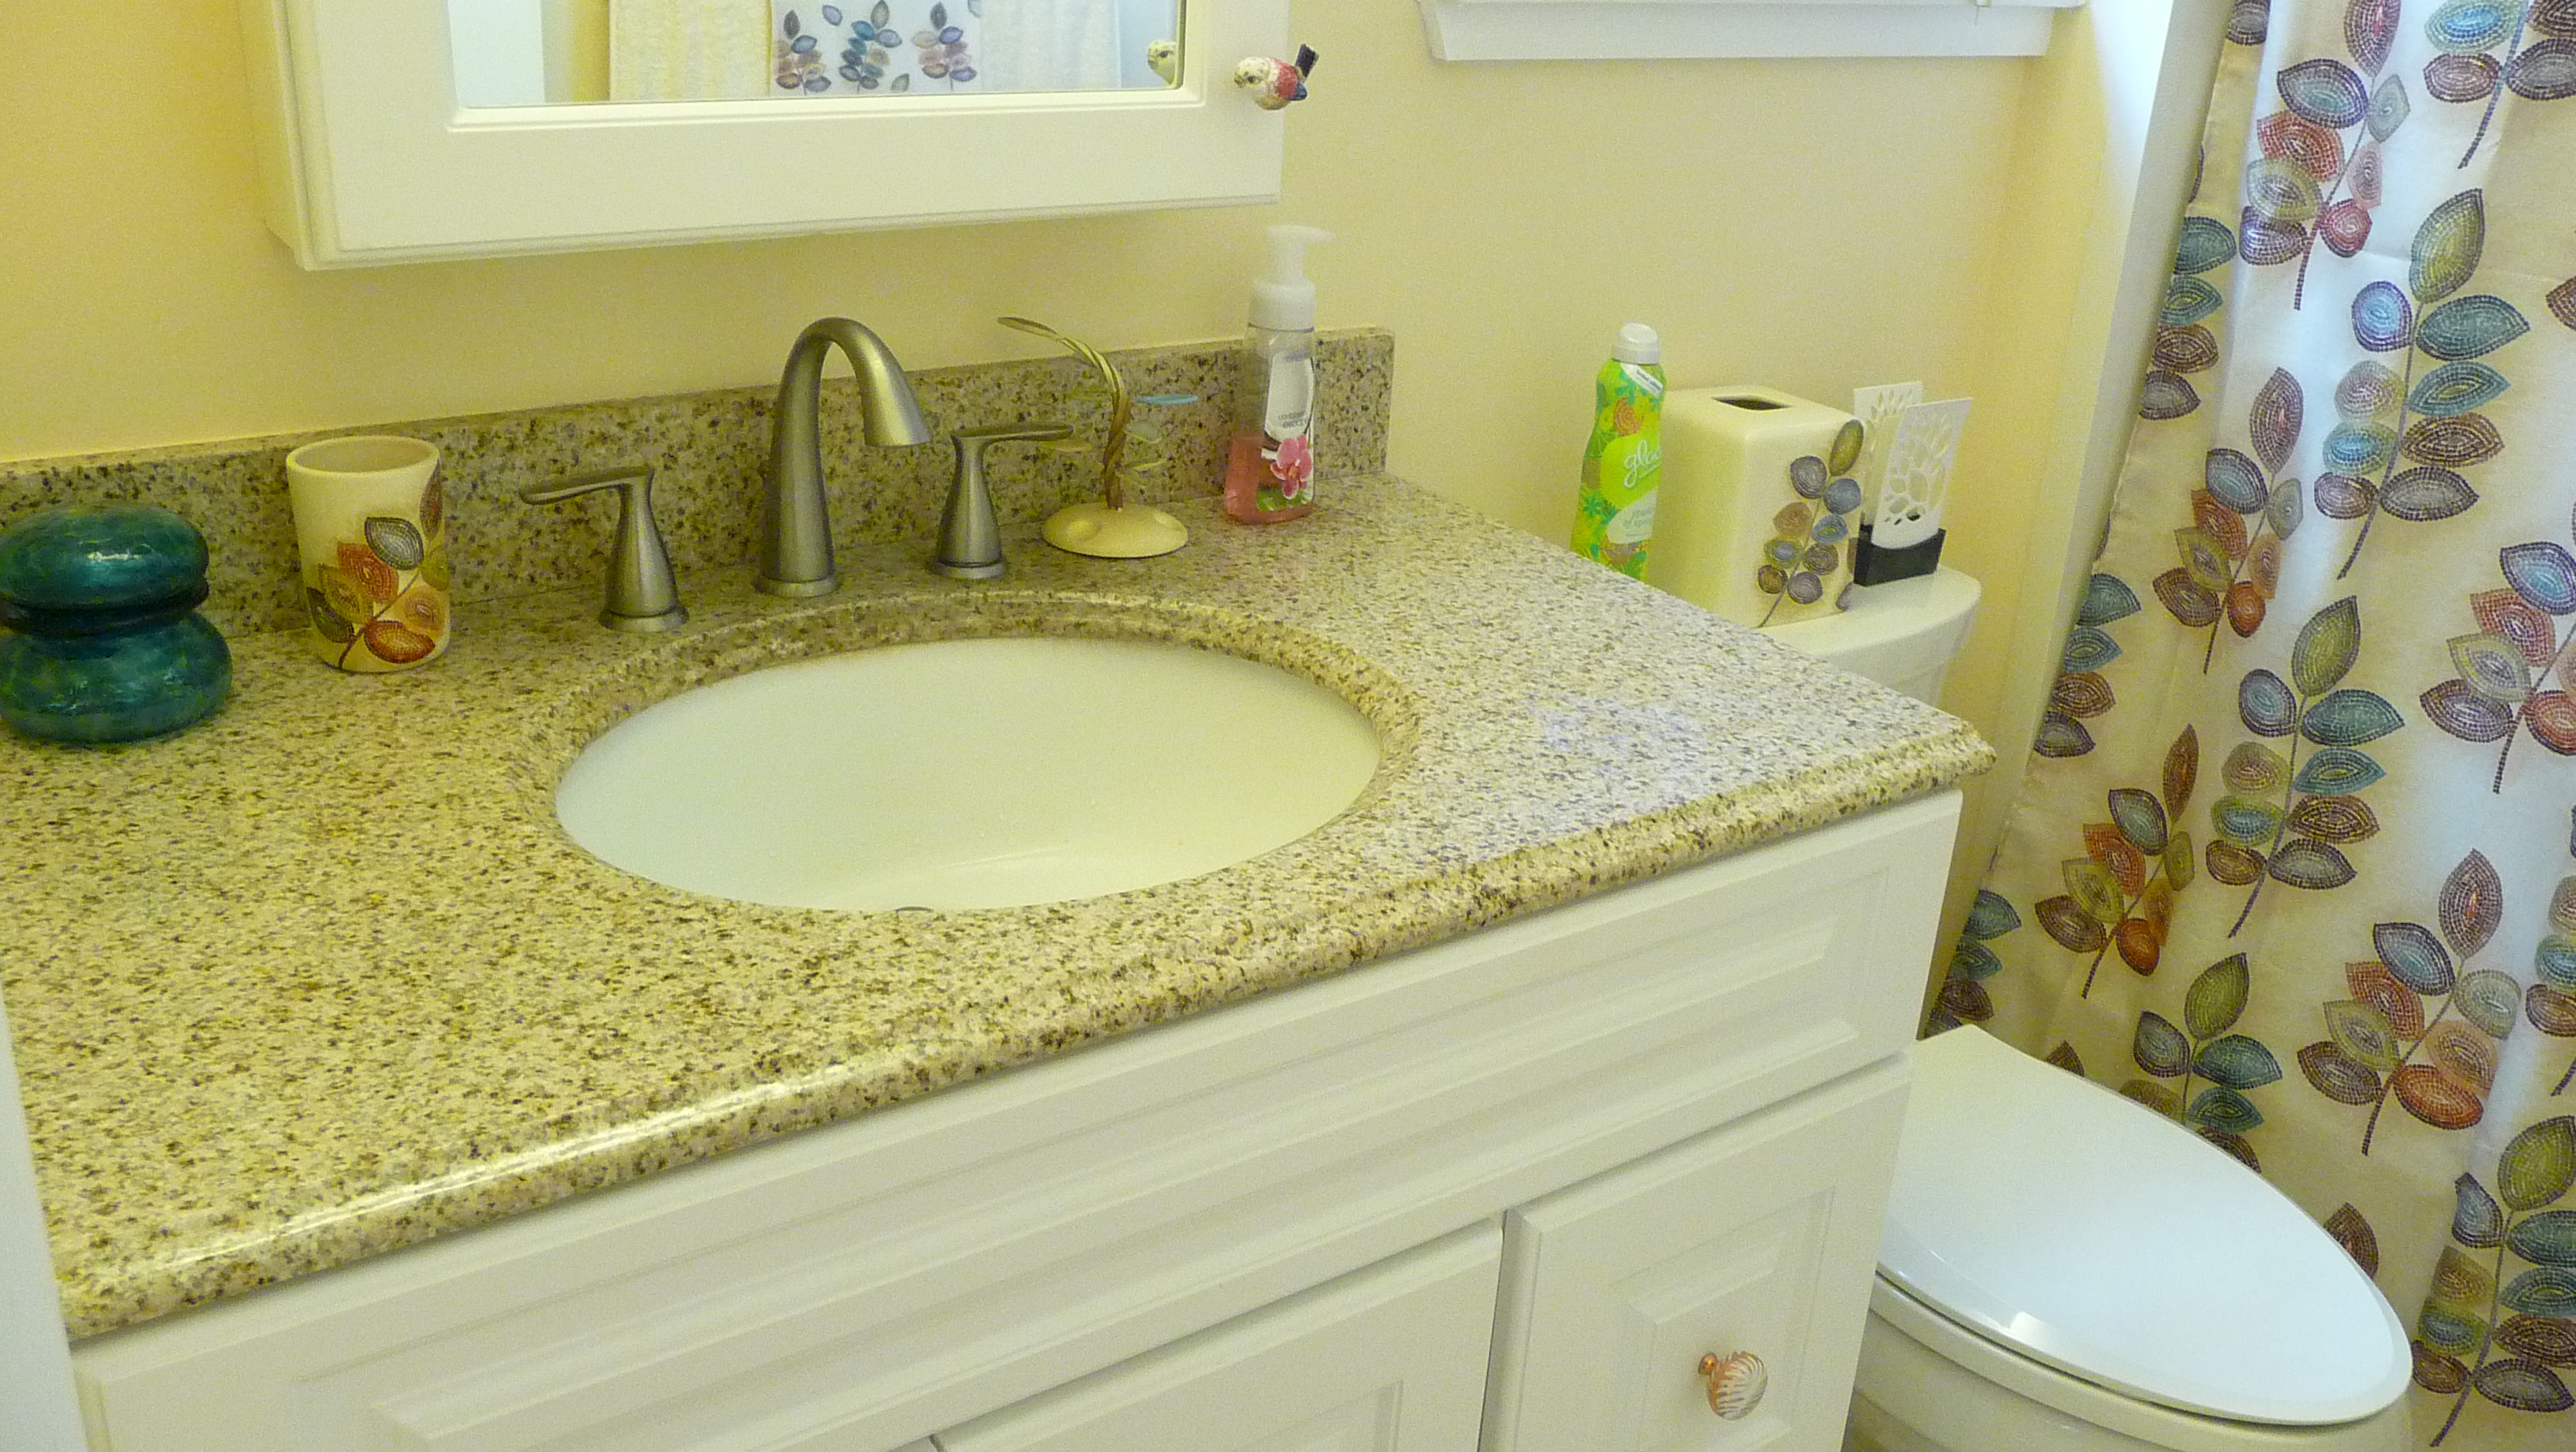
I want to feature the kitchen of a friend of mine (hi Kristen!), because she is a perfect example of the amazing transformation that countertop-painting can bring about!

Image

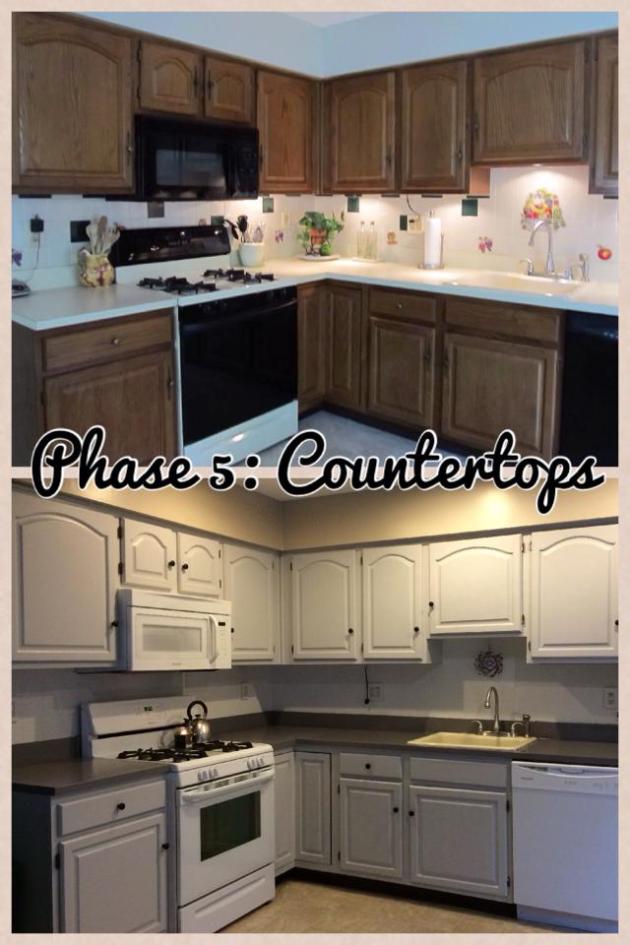
I’m 100% being honest when I say I don’t think I have ever seen such a huge transformation for so little money. You may wonder what this has to do with “retro”? The elements are there in a subtle way, with the brightened cabinets and brand-new, glossy white appliances (white/glossy was big in the 50′s, as it looked crisp and clean). It looked awesome before she painted the counters, but painting them completed it all. It took time and elbow grease, but her “I may as well try it, anything is better than what I have” attitude paid off! The resulting lovely shade of grey is the perfect complement to her shiny new appliances and grey cabinets. The kitchen has taken on a more “French country” feel. Let this photo stand as a testament to the fact that a kitchen that looks completely different needn’t break the bank. If you have bad, ugly, or old countertops but don’t want to shell out thousands right now for new ones, get your paint on (make sure to seal it afterwards). You can go classic and elegant like Kristen did, or try out a fun pop of color. The best part? If you don’t like it, try another color :-) There are also countertop-refinishing/refacing kits you can buy specifically for this type of project.

Back to more 50′s/vintage inspiration:

Image

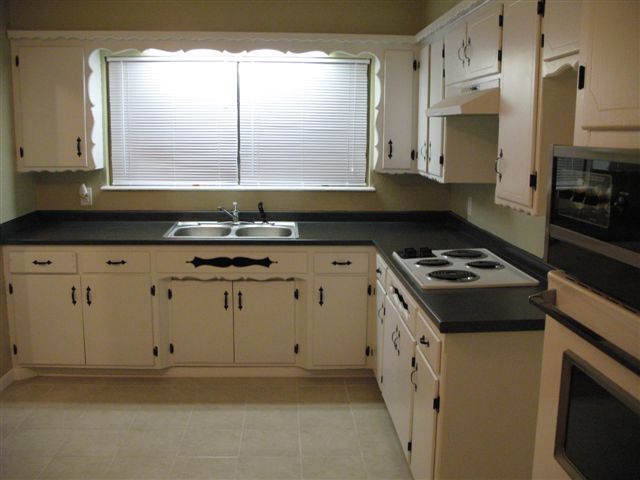
These homeowners painted their old wood cabinets while keeping an original retro stove and backplash. They painted their island and left the green enamel top as-is. Not a fan of that, but hey…it works for them. The biggest problem in this kitchen is THE CLUTTER THAT MAKES MY BRAIN EXPLODE and the yellowed, cream microwave. That should be white, and this kitchen needs a good “organize”, because it’s otherwise charming.

Here’s just an example of how brightening up your kitchen space can take your layout from “wind tunnel” to “fresh, clean, and open”:

Image

Their goldenrod accessories are a nice pop of color, too!

If you’re not doing an actual reno but want to add in a few fun 50′s elements, consider doing so with accessories! I’ve done some of this in my own kitchen and will add a few more soon.

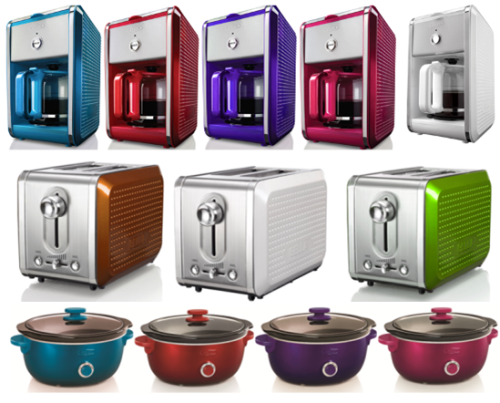
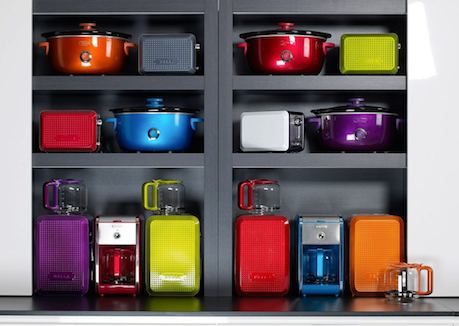
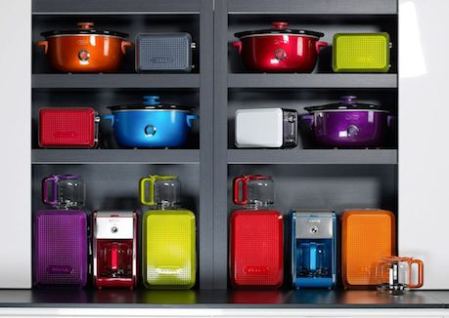
The Bella company makes cooking/kitchen appliances in excellent colors with a vintage-feel:

ImageImage

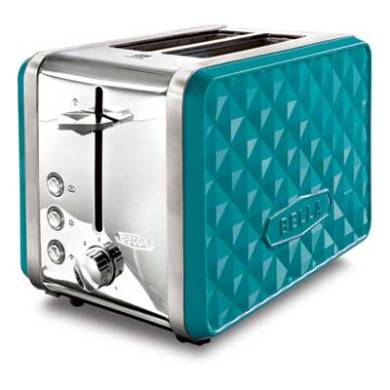
(I am thinking of buying that toaster for my own kitchen. This line is affordable and accessible).

Image

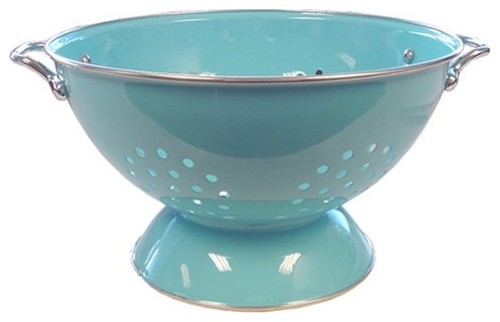
Another current trend is accessories that feel nostalgic:

ImageImageImage

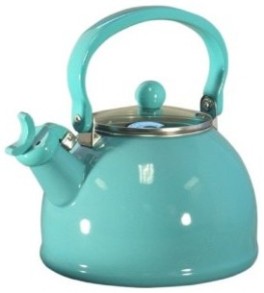
(I am clearly partial to aqua blue. Please excuse my blatant bias!)

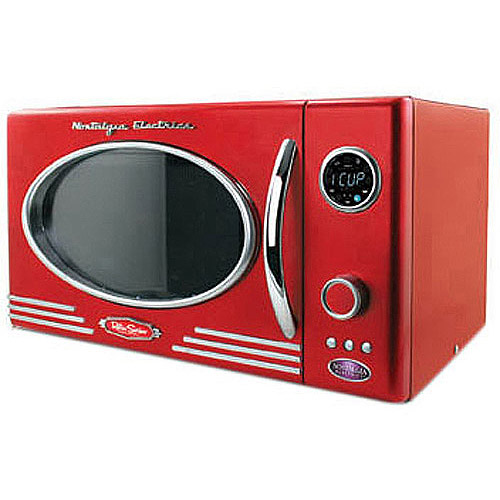
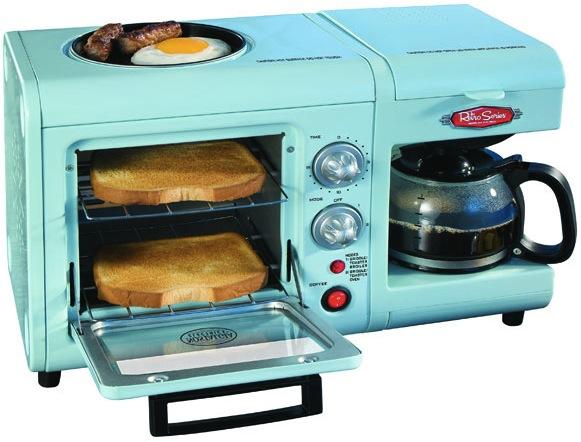
Appliances that feel vintage are gaining in popularity:

Image

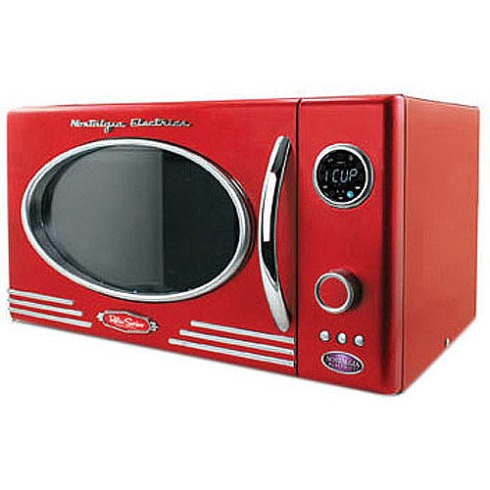
Fantastic microwave by Nostalgia Electrics.

Image

How. Freaking. Genius. It’s literally a breakfast station…coffee, toast, and eggs/meat on the top griddle. All wrapped up in an inexpensive and whimsical package.

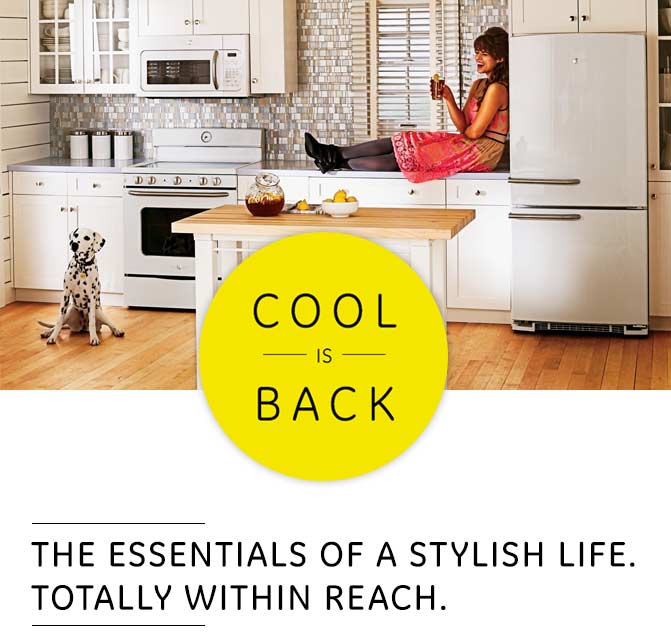
If you’ve got VERY deep pockets, you can outfit a kitchen in brand-new appliances that look vintage…by Big Chill:

Image

Image

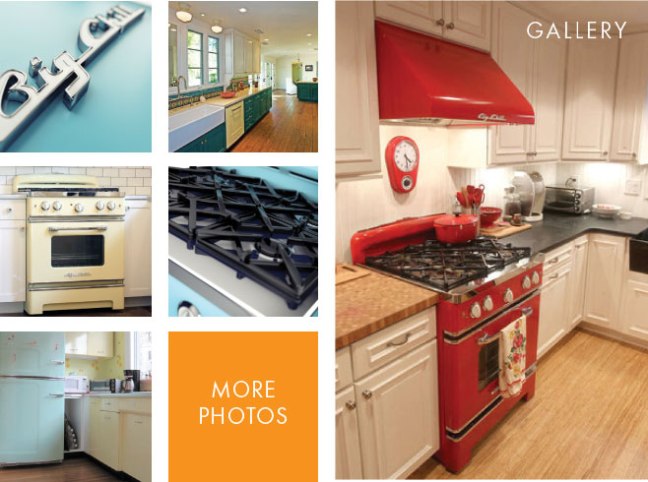
(I adore the mint green!)

They’ll set you back $3,000 for the fridge, $4,000+ for the range, $600 for the microwave, $1,700 for the dishwasher, $1,400 for a vent hood, and $3,000 if you choose a wall oven. They are STUNNING, but my goodness…the prices raise my blood-pressure!

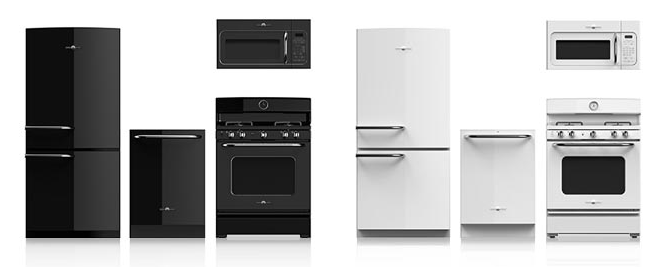
If you want affordable nostalgia, GE designed a line called “Artistry” which features a choice of black or white appliances that have a 50′s feel for VERY little money…you can easily get the whole kitchen full of appliances for about $2,000-$2,200, which is great!

Image

Image

Image

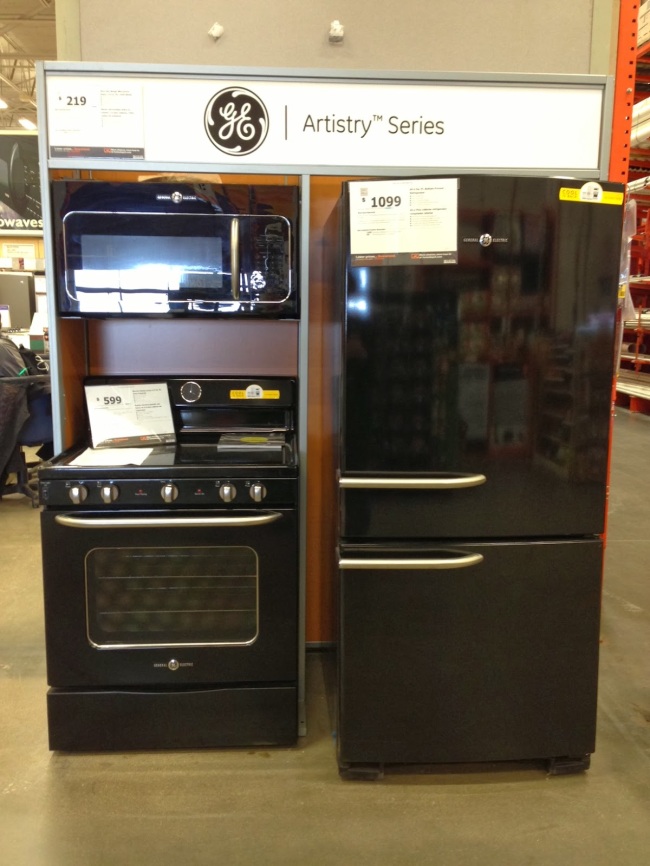
I fully admit that if I was not set on stainless for the look I wanted, I’d have bought these in white, hands-down, no-contest.

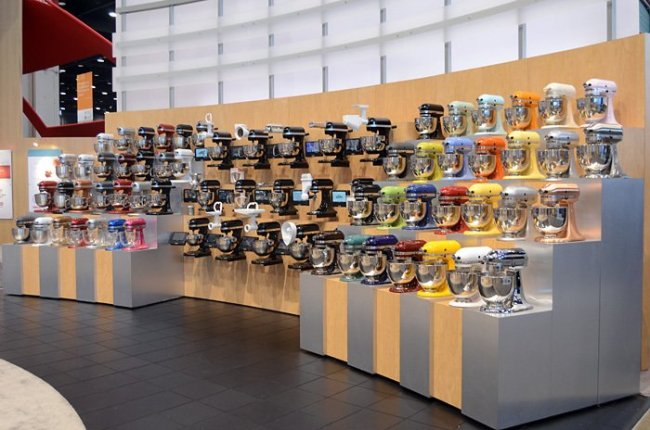
Another easy way to add a vintage element is with a colorful and endlessly useful Kitchenaid mixer!

Image

Image

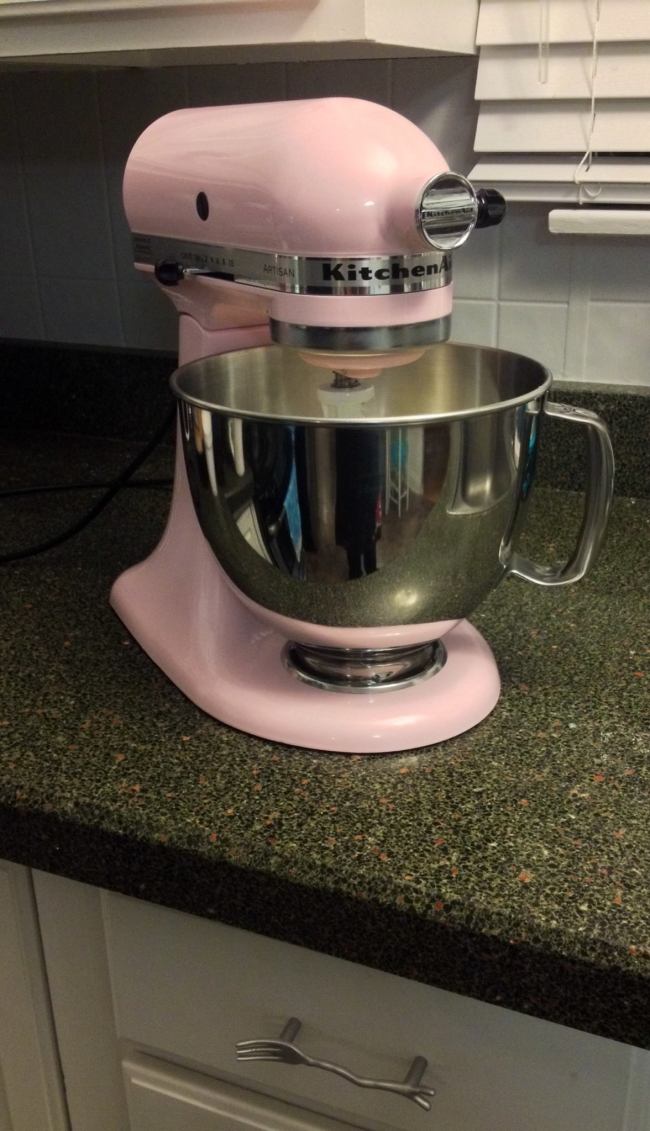
My hubby bought me this pale pink breast-cancer edition mixer…I named her “Loretta”:

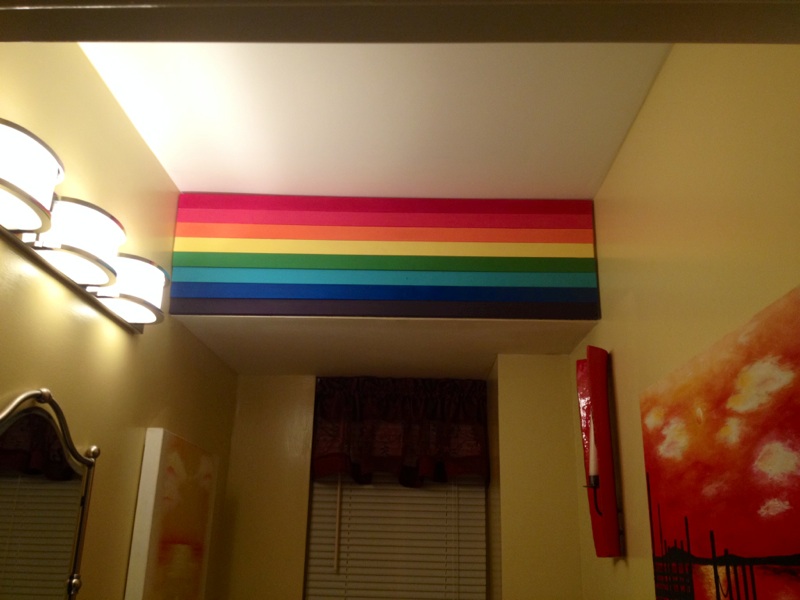
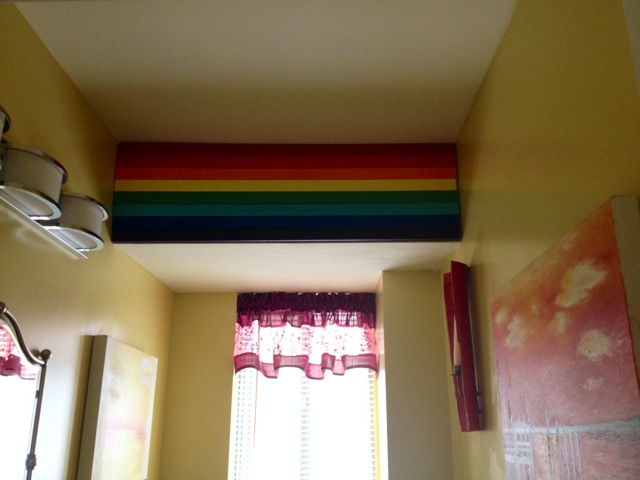
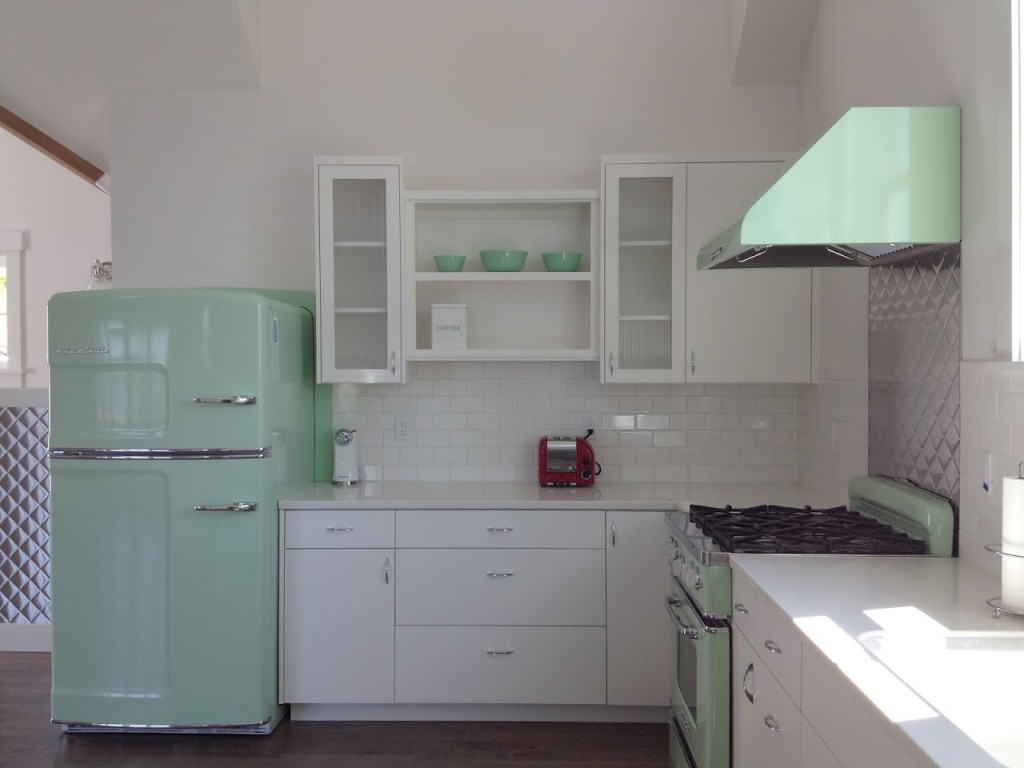
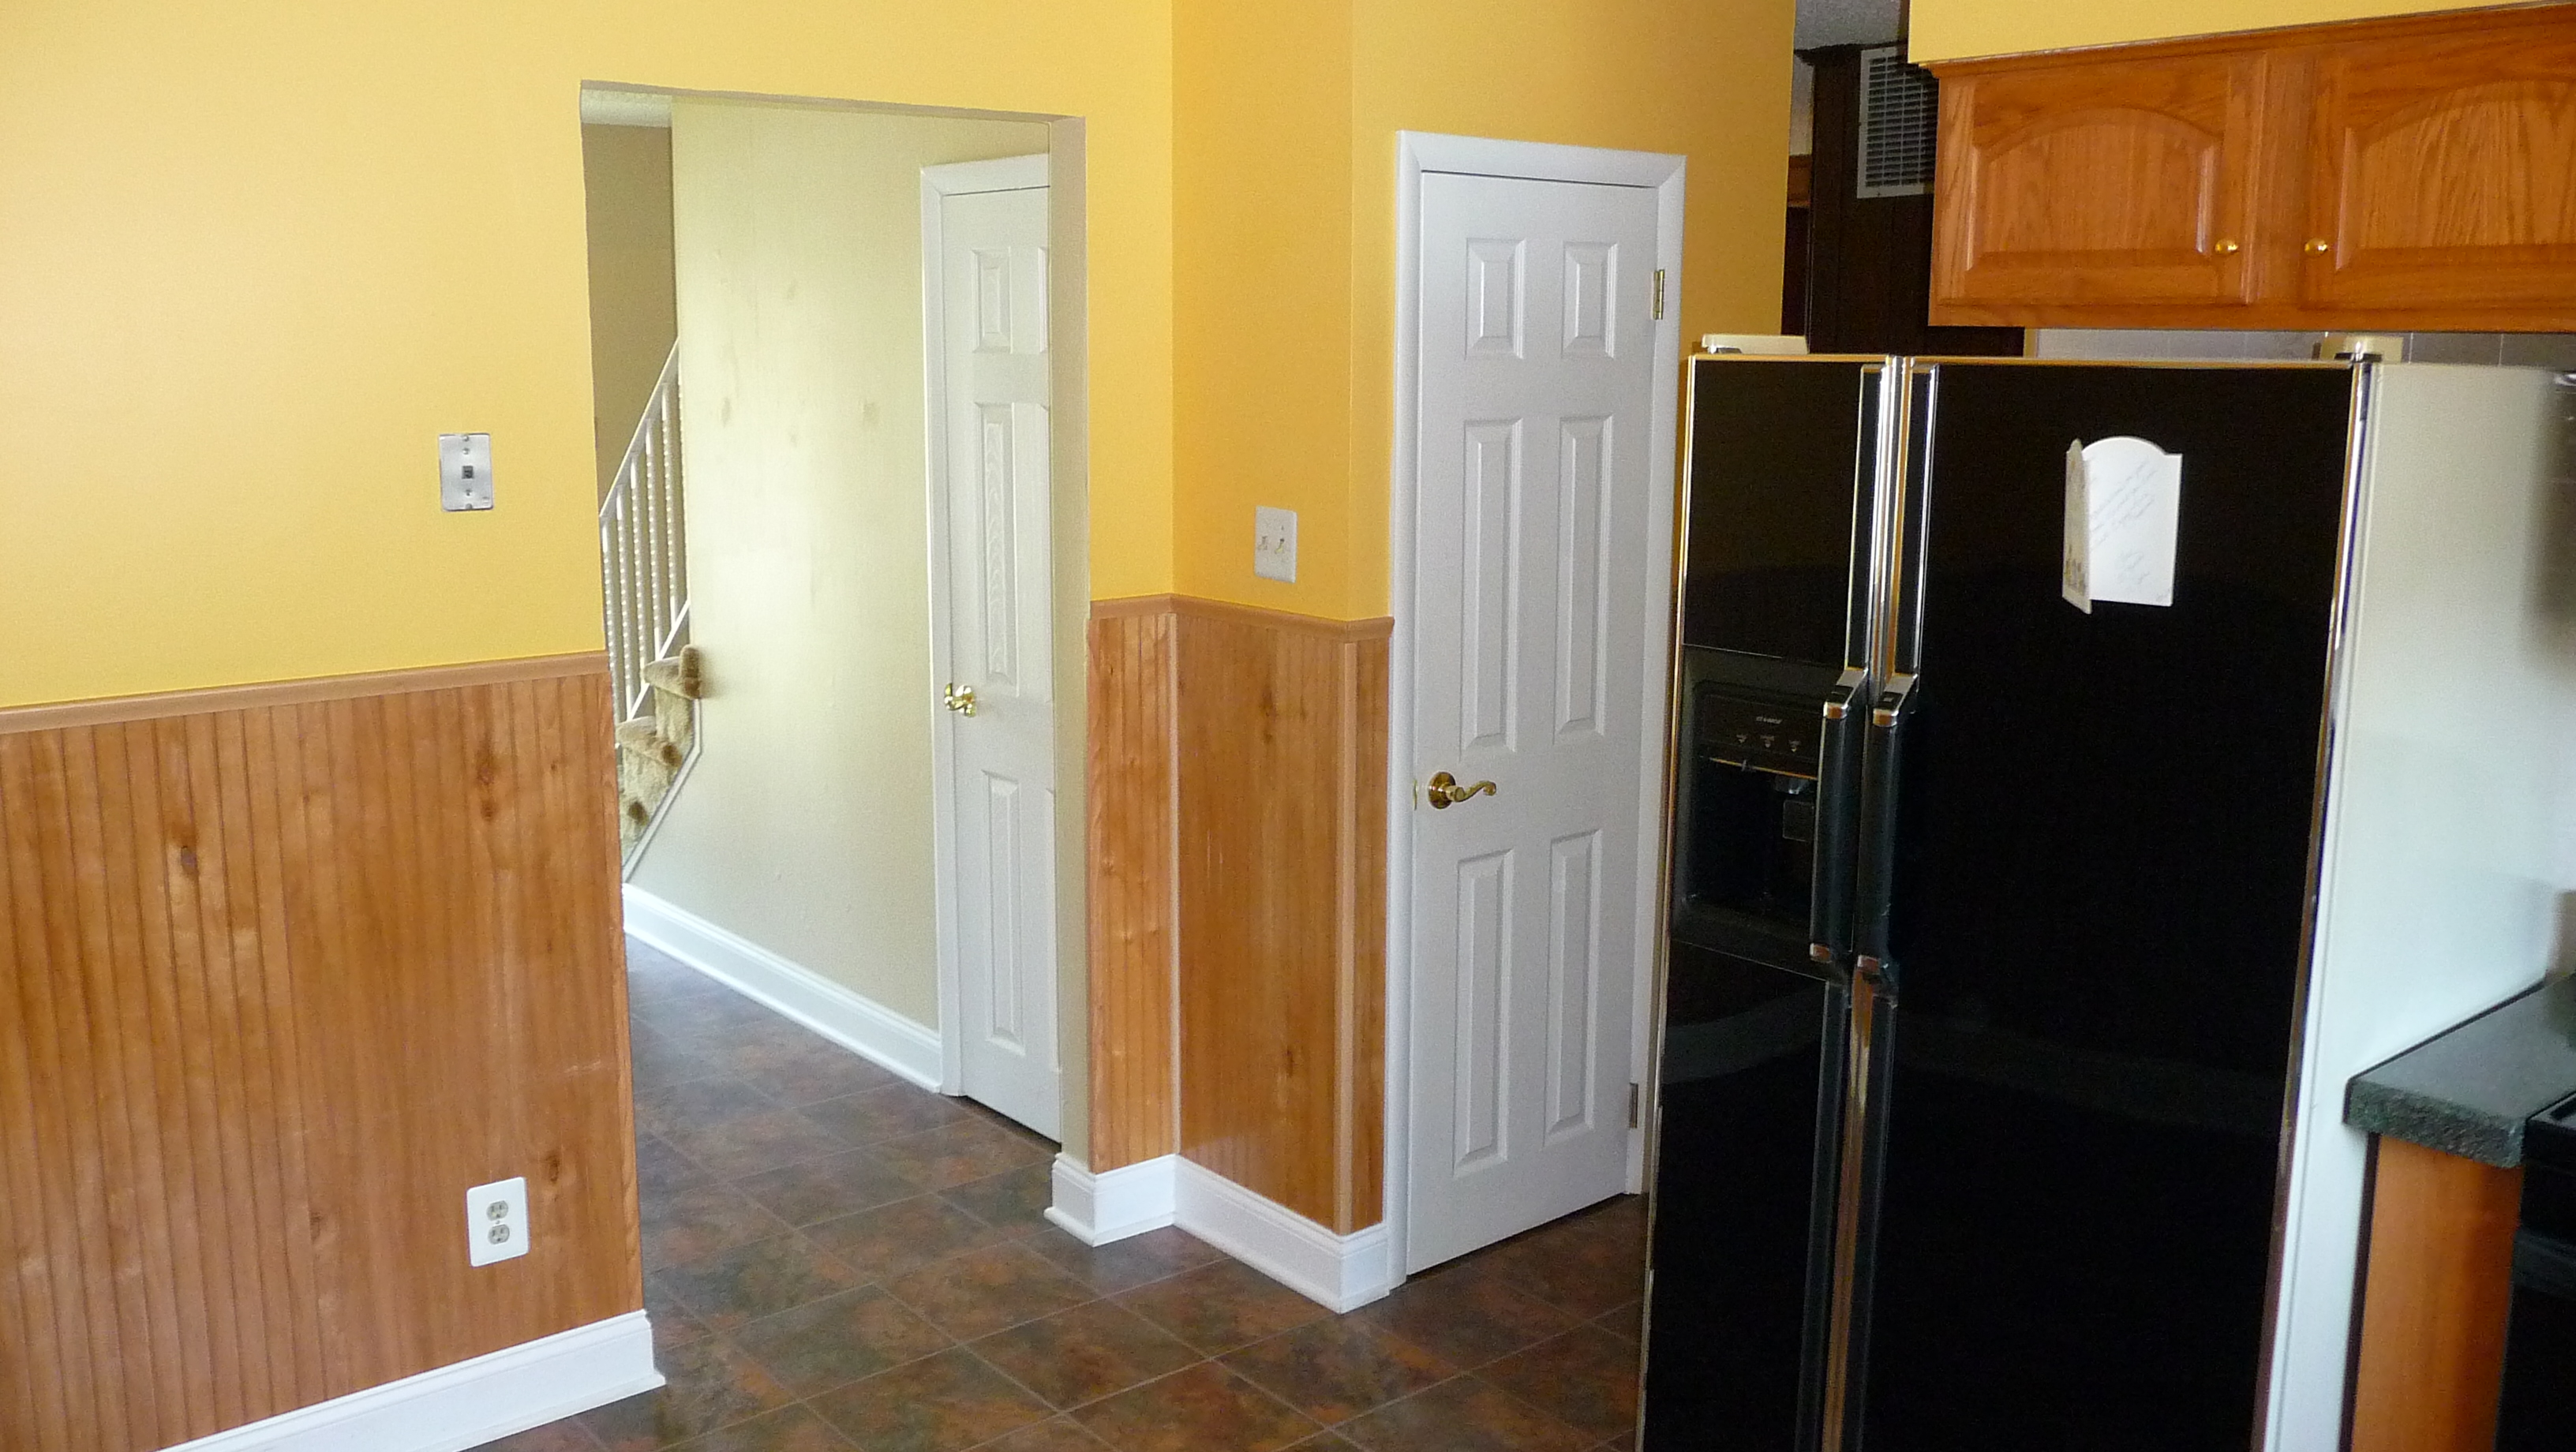
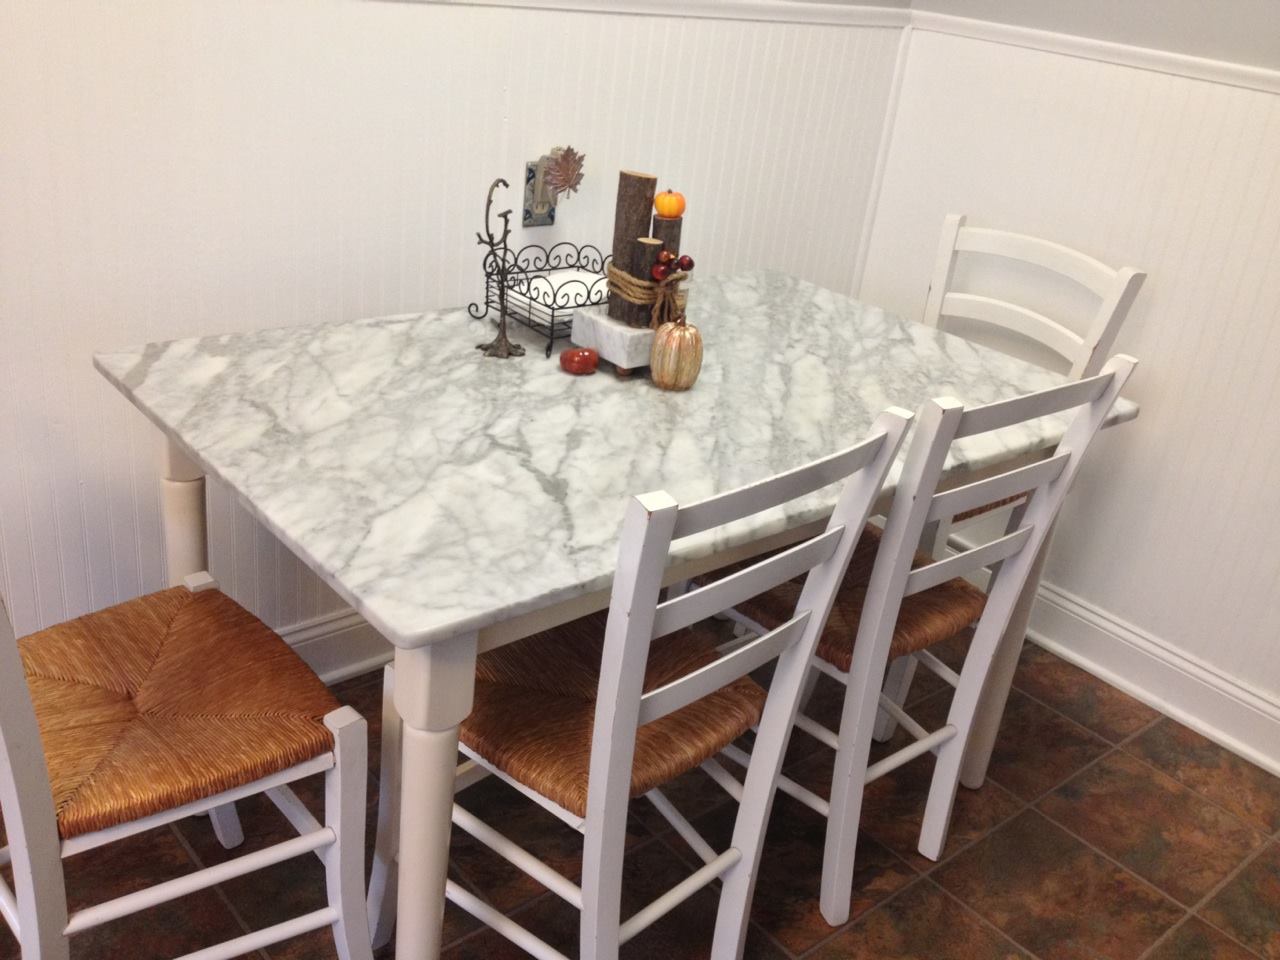
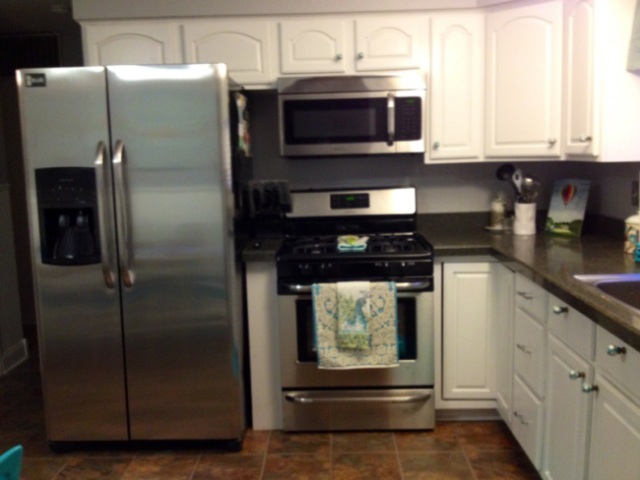
In conclusion, don’t shy away from playing around with 50′s elements in your kitchen, because the results can be inspiring and fabulous! Remember that it doesn’t take a lot of money to DIY a kitchen from something cringeworthy to something you’re proud to show off. I’ve ALWAYS loved the style of the 1950′s…all my life. I did not realize I was going in that direction when we re-did our kitchen, but the end-result clearly shows a lean to vintage/retro. I leave you with a reminder of my kitchen “before and after”, that cost us a measly $2,500:

Image

Image

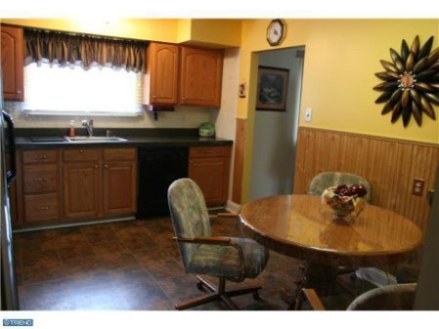
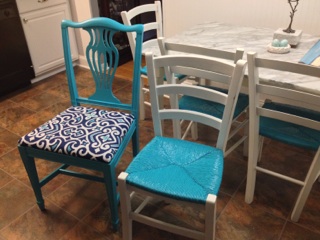
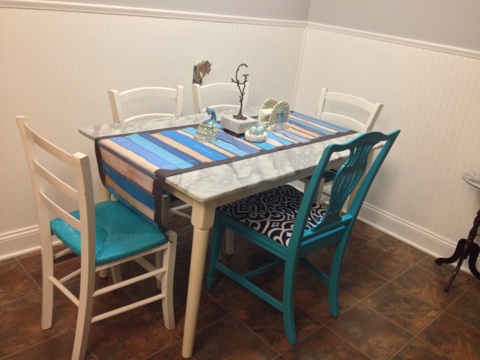
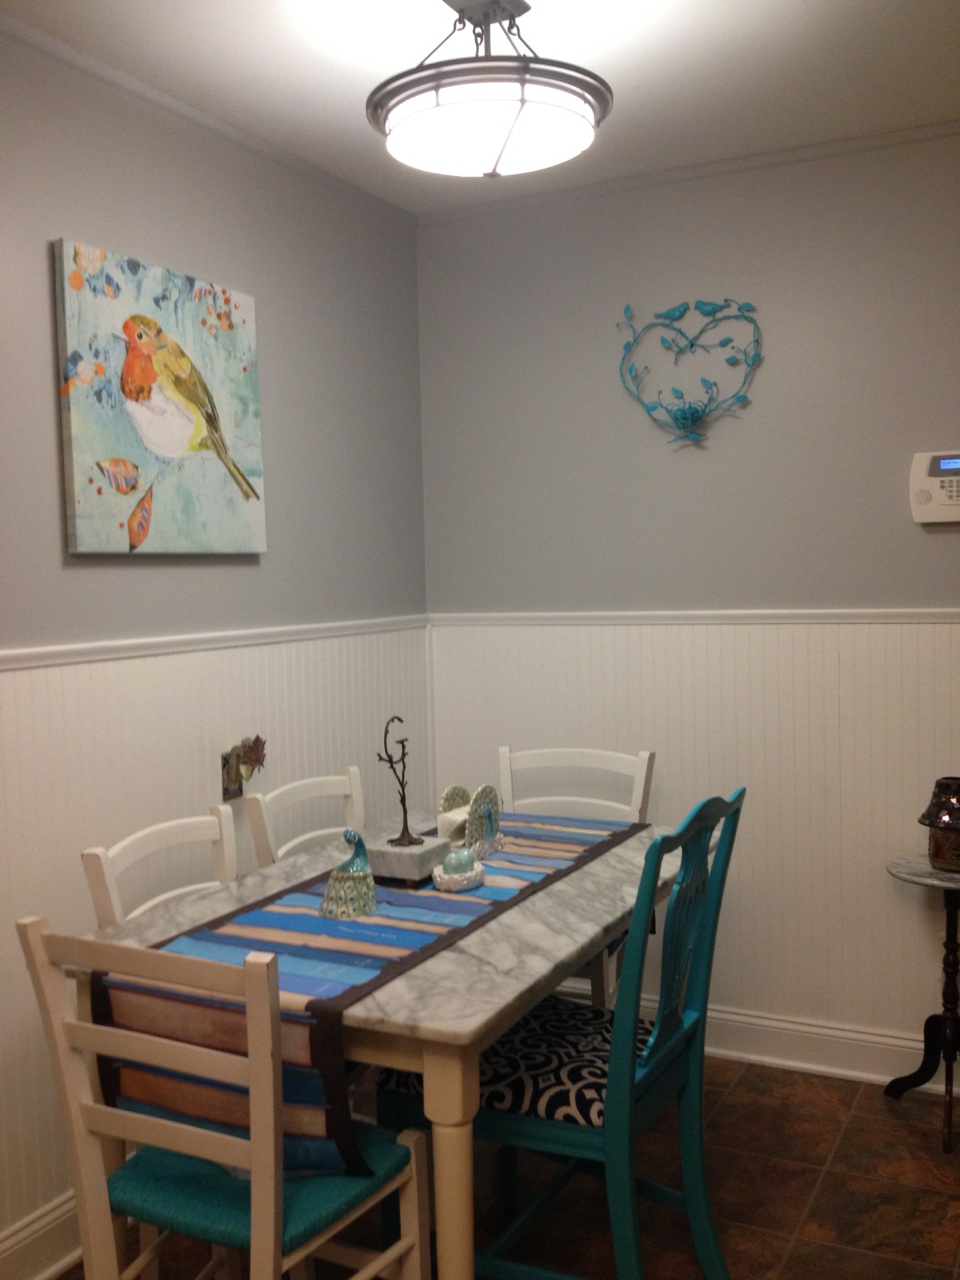
Now for our “accidental-50′s-inspired” after:

Image

Image

Image

Don’t be afraid to play around with style! Do what inspires you and makes you happy, while remembering that there’s always room for 1950′s charm in some element or another. Until next time…

Kitchen Phase 2: Mission Accomplished!

Standard

Our kitchen has come such a long way since we bought our house 6 months ago! It went from looking very 1970’s to sleek, beautiful, and fun. We got our appliances yesterday, so I wanted to show you the way everything looks, because this is the look that will stay for a very long time (until we tackle phase 3, which is knocking down a wall, having an island built, and having a mosaic backsplash put in).

As it stands, even without phase 3, the kitchen is officially fully updated!

Phase 1 involved a large amount of paint and a gargantuan amount of elbow grease, but it was also cheap! Yesterday, appliances went in…and though I can’t call that a “cheap” update, the price we paid for them was outstanding! When you see our kitchen photos from move-in day and from yesterday, you’ll be amazed at the transformation.

I talk often about “good bones” with a house, and I’ve said it numerous times about our kitchen. The layout was workable. There was an eat-in area. The 1995 oak cabinets were solid wood and in good enough shape to keep. They had Granite Transformations put in the counters, and the color was close enough to what we wanted that we decided to keep it. The beadboard on the walls was a plus, just ugly and unpainted. We had a good amount to “work with” and make better. Could we have ripped out the bulkhead, counters, backsplash, floor, beadboard, cabinets, etc? Sure! But I didn’t want to literally sink money into a major renovation. It works wonders for some, but the reality is that we’re both just too cheap and too DIY! 😉

I must say, my favorite “fix” was taking a shiny, oddly-textured early 90’s backsplash and painting it. It was shiny, white, oddly-textured linoleum and some tiles had weird beige bundles of flowers and wheat on them. I had the idea to try bonding primer and paint, and now the once-ugly backsplash matches our beautiful walls. It was a free update because we used the paint we had on hand, and I couldn’t be more pleased. If you don’t want to spend between $500-2000 (depending on your choices) for a new backsplash, consider this easy option.

I’ll walk you through the transformation of our kitchen from the time we first moved in up through today:

ImageImageImage

See? Good bones indeed, but in need of updates.

Here’s the result after we got our paint on and rid ourselves of the headache-inducing screaming yellow:

ImageImageImageImage

The walls looked a million times nicer with the blue-grey color, but that beadboard looked even worse. The solution?

Image

SO. MUCH. BETTER.

Then we decided to paint our oak cabinets white:

Image

Really brightened things up, didn’t it?!

Onto appliances…our dishwasher and fridge were from ’91 and the dishwasher and microwave from 2000 were both not working well. The fridge was shiny black, chrome, and had cream sides. 1 fridge, 3 colors. It drove me so crazy that we painted the sides with chalkboard paint to liven it up to be something I could live with until we could replace all the appliances at once:

ImageImage

I highly suggest that update!

As far as appliances go, let me preface it all by reminding you that I’m cheap. My husband is also cheap. I may have caviar taste and like nice things, but I’m cheap! We couldn’t bring ourselves to buy appliances until Black Friday sales began popping up, as that tends to yield the best deals. I know people who spent 4 grand or more on appliances, and the thought made my heart palpitate. I came up with a budget of $2,000 for the fridge, dishwasher, over-range microwave, and gas range. The goal was good, basic appliances. We knew stainless steel was the look we were going for (sleek and industrial). Our original black-and-gray-and-white kitchen idea morphed into something with many pops of teal blue and something a lot more fun… with a punch of personality!

Home Depot had a “Pre-Black Friday” ad out and I saw exactly what I wanted at the price I wanted to pay. Furthermore, we got no-interest for 6 months (I like paying $500 a month with no interest way better than paying in cash all at once), free delivery, free haul-away, and installation for $2,000 and some tax. We went with Frigidaire. I did the best measurements I could and the fridge ended up being slightly too tall for our “built when fridges were smaller” cabinets, so hubby made a few small cuts and the crisis was averted.

Anyway, we’re more than pleased with the look. The fridge is so much bigger than the last one! Luckily for my parents, my dad was in the garage when their older-than-me spare fridge sparked a small electrical fire and died or “took a crap” in the eloquent and elegant words of my dad. Our chalk-board-sided black fridge goes to them as their new spare 🙂

Once more with “before”:

l5c660444-m5x P1070729


And now, our current kitchen:

ImageImageImageImageImage

And of course, the fun and new eat-in-area highlighted in my last entry:

ImageImage

The best part of it all is that all of these updates combined cost us just $2,500 between lots of paint, elbow grease, salvaging items for free, a Craigslisted marble-top table and chairs, re-purposing current items, and appliances. It really doesn’t even look like the same kitchen. I couldn’t be happier, honestly. “The Anonymous Kitchen” is my pet-peeve (the same one everyone has, with the dark cabinets, tile backsplash, neutral walls, beige granite, and stainless appliances), and we have one that nobody else does thanks to DIY skills, imagination, and a very small amount of money (as kitchens go). “The Anonymous Kitchen” might be gorgeous, but this one looks and feels like us! I’m a “warm” person…so this is the first cool-toned room I’ve ever had or done. I enjoy that the kitchen has so much personality and stands alone from the rest of our home without clashing from the “feel” of it, thanks to the personalized touched and unique items.

::Happy warm-fuzzies::

Until next time…

Fresh, new, and (something) blue!

Standard

FIRST, let me apologize for it being so freaking long since I last posted. I have been eating, sleeping, and breathing my new job! I wish I was able to post at the frequency I did over the summer, but the reality is that I have so little free time on my hands.

Either way, I can tell you that I am more excited about this entry than any of my others thus far. Truth be told, the idea happened kind of by accident! I mentioned my future kitchen plans in a previous entry. In this, I spoke of plans to take down a wall and have a custom island built with seating and storage and a granite or marble top. This would cost a number in the thousands. Then the new school year began, and even with a large increase in income, we saw how much rebuilding and prioritizing needed to be done before we could ever hope to do that renovation! We were planning to buy Jeff’s new car in the late fall, but have pushed those plans back to the spring. We decided a vacation back to Bermuda to celebrate a number of things (most of all, our 5th wedding anniversary) was high on our priority list, so that will happen in the summer of 2014. We are keeping our Black Friday timeline for our new stainless appliances (goodbye, 1990’s black appliances). The kitchen demo/reno/island fell back.

SO…we arrive at the point so many others do. The point of “It’ll happen at some point…later.”

I was looking at our beautiful kitchen table and stylish chairs one day when it hit me that they were about to not match a single thing in our kitchen anymore. As soon as those appliances come in, it would just look so wrong and mismatched. It was a hard realization because Jeff and I salvaged and refinished that table together before we moved into our first apartment. It was our first project together. We love it. It’s a part of our history! We spent countless hours doing it all by hand in my grandparents’ garage, and let me tell you…if you’ve never refinished a dining room table by sanding totally by hand, then don’t (if you enjoy having skin on the pads of your fingers, that is!)

Image

Anyway, the thought of it not being in our kitchen hurt. But I’m a realist above all else, and I knew it wouldn’t work. Luckily, my fantastic little brother is a PA who recently started his first job as an Endocrinologist. College is over, he’s got a real job now, and will be getting his own place in a few months. Aside from looking like twins, we also have similar styles and tastes. It makes me happy to know that it will find a new home with someone I love, who will appreciate it like I do. On an unrelated but “awww” kind of note, I also just bought him his first piece of original art for when he has a bachelor pad. Enough gushing…

So that left the question of what to put in the kitchen when new appliances come in. Many people leave things “as is” while waiting to renovate and are not people to make interim changes. I, however, am a HUGE fan of interim (and cheap) changes! Why not put a little elbow grease into making a space into something you like and can live with until you can afford the expensive reno?!

Anyone who knows me knows of my big, big love of carrara marble. If I had an unlimited budget and could build a kitchen from scratch, three guesses what my countertops would be:Image

I’m just sayin’, is there anything more beautiful and classic?

So, you can imagine my happiness when a kitchen table set with a carrara marble top popped up on Craigslist for the bargain price of $70. It had an off-white base and 4 distressed white chairs with wicker seats.  I particularly loved the grain in this piece of marble. The cool grey would complement the new appliances and the cabinets we painted white (see my kitchen entry for details). Also, because it’s marble, I could use it to prep and serve food! It may seem a small thing, but that really comes in handy. Here’s the set we picked up:Image

How gorgeous is that marble?

Around the same time, I got the thought in my head that I wanted to add a fun pop of blue (likely Tiffany blue) to the kitchen in the form of a refinished dining chair. Problem was, finding a free or inexpensive set of 4 to go with the marble table was not in the cards! I wanted to keep the total for the eat-in area under $100, so that hinged on my being able to salvage a chair or chairs. I was not having luck until I spotted this on the side of the road by a neighbor’s home one day:

Image

Image

😉

The chair was solid mahogany, at least 50 years old, and sturdy. Hubby helped me do the minor needed repairs! I had Tiffany blue on the brain but when I saw this deeper, brighter teal, it was love at first sight!Image

Rustoleum’s “Seaside” in a gloss finish.

I gave the chair a good scuff and light sand and then got my spray on! As you can see, there was a lot of overspray, so I switched to a tarp. Here’s the chair without the seat pad:

Image

The next step was to choose a fabric to recover the seating pad. Jeff and I went to Joann’s and found a great pattern that picked up the teal and was 40% off. It’s a durable fabric made for outdoor cushions. We ended up using $6 worth of fabric and $6 plus change in paint, making this wonderful chair a mere $12 of fun!

Image

Image

After the chair was finished, I began to look at and dislike the wicker seats on the kitchen chairs. They ended up removed, taken outside onto the tarp, and….

Image

(painted to match the chair). The top got 2 coats and the bottoms that you don’t see got 1. The paint covered well and evenly, and the result is wonderful:

Image

A while back, a table runner I adored at Anthropologie came onto clearance for $14. It’s a whimsical cotton twill runner in a blue book motif with fun titles on the books. I knew I’d eventually find the perfect use for it. It’s been folded away for a few months now. Re-purposing some accessories and a table runner later, and this fabulous eat-in area is ours!

ImageImageImageImageImage

SO. MUCH. FUN.

On the wall, I had a distressed white wrought iron bird wreath from Pier 1. On yet another whim, I took it down and painted it to match the chairs, and it really pops now!

ImageImage

There are no words adequate enough to describe how thrilled I am with our new eat-in nook! It’s fresh, fun, bright, cheery, and uniquely “us”.

Now for the customary cost breakdown:

Marble-top table and chairs from Craigslist: $70

Paint: $12

Sandpaper: $3

Fabric: $6

Re-purposed accessories, runner, and wreath that I already owned: Free!

Project total: $91

And just a reminder of how the other side of the kitchen currently looks after our fun knobs and painted cabinets:

P1070920

Bathroom Before & After

Standard

When we got this house, we did NOT like the bathroom. It was…well, to use a friend’s favorite adjective…tragic. It was as if the Jersey shore exploded in our tiny bathroom. I’m talking beachy-keen wallpaper, and border with very large shells on it. Also included were a dated vanity with bad fixtures and a floor comprised of a sheet of white linoleum with grooved squares. If the wallpaper wasn’t awful enough, it was 4 layers deep with one layer of wallpaper tacked on top of another, from the 60’s up through now.

Now for the *lovely* photos…

Image

Image

Image

Image

Not ideal.

With the shower being the exception, the bathroom ended up being a “gut”.  The wallpaper over the years ruined the walls and could not be stripped without taking chunks of 1960’s drywall with it. We paid our contractor to re-drywall and paint the whole bathroom. We were not pleased, but felt it was better to have something done once and done right! We had mold/water resistant drywall put in to be safer. I was going to put a cool khaki color on the walls, but decided to use the very warm and brighter shade we used in the master.

We chose a white vanity by Allen & Roth with a matching medicine cabinet that is tall with a large mirror (not to mention a ton of storage). We picked out a brushed nickel light fixture with an interesting swirled design. We found a granite color that we love for the vanity top to complete the look. After choosing brushed nickel finishings for the faucet and toilet paper holder/towel rack, I found some great knobs for $2.95 each at Anthropologie. All else came from Lowe’s.

We just had the floor done with the porcelain tile that resembles wood, and our contractor made us a concrete/silestone room transition since a typical one wouldn’t fit (the room steps up from the hardwood in the hall). It looks like we laid driftwood in our bathroom, and the result is awesome! Neutral enough to keep indefinitely, even if we change out the decor colors in the future.

As for accessories, I fell in love with Croscill’s “mosaic leaves” collection, and got it all at Bed, Bath & Beyond with their 20% off coupons.

The result after the remodel is a bathroom that is warm, bright, fun, and really cheerful. It may be small, but it’s gorgeous and we enjoy it!

Here are the after photos:

Image

Image

Image

Image

ImageImage

So. Much. Better.

This was not a “cheap” project, really. But the end result still cost a lot less than many people I know have spent on their bathrooms. The breakdown is:

New drywall, framing out the door and the windows, new baseboards, new paint: $1500

New vanity, granite top, medicine cabinet, and light fixture: $644 (yep, that’s the exact amount).

New brushed nickel fixtures and finishes: $120

New knobs from Anthropologie: $15

New 6 panel door to replace the ugly and creepy slat door: $25

Bathroom accessories (including outlet covers, decal, painting, and wall art): $150.

Grand total: $2,300 rounded up.

Trash to Treasure: Rocking Chair

Standard

It’s been about a week since I’ve updated the blog. Please excuse my lack of attention! Life has been extremely busy, and I’ve been celebrating a fantastic (and long-awaited) new job offer!

A week and a half ago, my husband was on his way home from work and took a shortcut through a nearby neighborhood. Someone had put this out to the curb with the trash:

Image

An old but nicely detailed hickory rocking chair. It needed tightening and some new screws, which hubby so kindly did for me!

I loved it immediately and knew I wanted to make it over and put it in my guest room/future nursery. I have reading chairs all over the house and thought this room needed one as well.

I usually always choose to refinish wood and almost never paint it! I am a wood and furniture junkie and think the grain and quality of wood comprises much of the beauty of a piece. My exception to the rule is kitchen cabinets, because I love a light and bright kitchen!

As soon as I looked at the rocker, I thought “WHITE!”. It just needed to be white, period. I got started immediately. I painted on a coat of my trusty bonding primer after rubbing the chair down with mineral spirits on a clean rag. I then used up some white trim paint that we had left but was unhappy with the coverage, which was uneven around the fine details. I then switched to Rustoleum’s spray paint/primer:

Image

The rocker was old and worn in some spots, so it did not take the paint completely evenly (and I strive for perfection), but all in all, I was pleased with the results. It got two good coats with a 3rd and final spray in some spots.

Next up was choosing a chair cover. I searched first at Pier 1, one of my absolute favorite home stores. I didn’t see anything I loved for a price I wanted to pay (I’m cheap). I then switched my search to Pottery Barn, another favorite. I got lucky when looking for clearance chair cushions. This color, the blue and white “Maia” pattern, was what I had decided on originally:Image

However, I then came across the Tiffany-blue colored “Alessandra” pattern and fell in love. It was exactly what I was looking for, and even better…less than half-price with free shipping to boot! I bought the largest size cushion because the rocker is pretty large and I wanted the whole seat covered. Let me tell you…it just BARELY fits on. It does, but any bigger and it’d have been too large. Note that if you shop Pottery Barn and find something you love on clearance, you cannot return the item.

Here are the results. Not bad for a side of the road find, right?!

ImageImageImageImageImageImage

And, of course, here are some photos of the chair in its “home”…the guest room (click to enlarge them):

P1070979 P1070980

The total cost of this project was a mere $20!

Next time you see something with real potential on the side of the road, consider taking it home and turning someone’s trash into your treasure! It’s inexpensive, easy, and you end up with a beautiful item for your home!

Cha-cha-cha-chalkboard!

Standard

Remember in a previous entry, I complained about my kitchen appliances? The fridge was the worst offender and the UGLIEST thing ever in life. Black, shiny, non-magnetic front, chrome accents, creme colored sides. It was a sad, sad machine. Also, it should be noted that it was made in 1991, when I was SIX YEARS OLD!  Ugh. However, we are not currently at liberty to fork over the money for a kitchen full of stainless appliances, and I have a “thing” about appliances not matching. So when we do one, we’ll do all.

My lovely friend Kait suggested chalkboard paint one day. I looked into it, thought it was the coolest idea, and we decided to give it a “go”. Even if we royally screwed it up, it certainly couldn’t look worse than it already did! We had a lot of paint supplies left over from previous projects and plenty of leftover bonding primer, so literally all we needed was a $10 quart of chalkboard paint (which was enough for our fridge).

Here was what we were working with beforehand:

Image

::shudders::

For the record, you can paint virtually anything with this chalkboard paint…walls, cabinets, the glass on photo-frames, mirrors, etc.

We did prep the sides of the fridge to ensure the best possible adhesion of the paint. We rubbed it down with mineral spirits and gave it a scuff-sand. We then painted it with bonding primer. We found that paint rollers were more than up to the job, and only needed the brushed for fine details and some edges.

Here is what we had after the bonding primer went on:Image

Already better than creme!

Here is the product to buy (Rust-Oleum makes it):

Image

A helpful tip: MIX, MIX, MIX! I had to stir the paint for a good five to seven minutes to properly mix and blend it. You want to make sure it’s as even and stirred as possible so that it works the way it should.

Here’s the so-much-better end result before adding artwork:

Image

You give the paint three days to dry, then “condition” it by rubbing chalk dust (the side of a piece of chalk) over the surface before drawing for the first time, and then rubbing with a paper towel. This makes the paint easier to wipe clean in the future. After we conditioned it, my beautiful mother-in-law who is up visiting from Florida went to town with the colored chalk, to this result:

ImageImage

The cupcake on the fridge was drawn by my mom 🙂

Hubby did this:

Image

My mother-in-law made me this fabulous pink chalk basket with a container, magnets, and pipecleaners:Image

All in all, a fast, easy, cheap, and FUN project! I’d recommend this to anyone. The product is great and so was the end-result. I no longer hate my fridge and therefore don’t complain about it being an eyesore everyday (which Jeff is glad about). A win-win situation.

Dining Room Decor

Standard

Today I want to switch gears a little, from renovations to decor. I want to focus in on the dining room! Maybe you’ve got a formal dining room, perhaps you’ve got just an eat-in-kitchen. Either way, I hope you glean some ideas from this entry that will help you set it up with style.

Let me first say that I didn’t really want the “typical” dining room that is used once or twice a year. I wanted the room to be a showpiece, but one that could be used at any time, one that felt inviting and did not put out the “Do not touch anything in this fancy room” vibe. I certainly enjoy using my china for tea services and even for just my morning coffee. I’m continually saying “Life is short, use the china!” to the amusement of family and friends.

It would be easier to begin by showing you the dining room as it was when we toured our house so you know what we were working with:

Image

So…yeah…

A 90’s-fab chandelier, decor not to our taste, carpet. AGAIN, though, great “bones”!

If you look back a few entries, you will see that we refinished our home’s original hardwood floors, so I had that to work with when decorating.

The most important thing when setting up a formal dining room is absolutely selecting the furniture, which comes in just about every color, every wood type, every style, every budget. If you do not have a family set, your options are to buy new or buy used. You can go for any kind of look you want…modern, traditional, antique, whimsical. I’m a girl who knows what she wants, so I have always wanted a mahogany set in the formal Queen Anne style. My parents have a stunning cherry Thomasville dining room suite that is Queen Anne style, and I have admired it since the day they got it.

As you can guess, my choice does not come cheap…in fact, it’s one of the most expensive types on the market. I don’t do particleboard and every wood surface in my home is solid. I did not want to plunk $5,000-$10,000 down for a brand new set. My favorite solution? Buy used!

I scoured Craigslist (more on that at a later date), and a family in a wealthy neighborhood was moving. I found my dream set there, for the bargain price of $1,000, which included the table with 2 leaves, 6 chairs (2 captain’s chairs, 4 armchairs), a hutch, and a curio. The maker is Bassett, which is quality. Definitely see if you can find a maker’s mark if you are buying used.

Next step? Getting rid of that awful chandelier! We found exactly what we were looking for at Lowe’s. For fixtures, we gravitate to oil-rubbed bronze, but the bottom line is to buy what you love. $100 bought us our nice, new one.

If you’ve got a hardwood floor, you should absolutely buy an area rug for under your table. It adds style and protects the flooring. I do not like room-size rugs, but that is a personal preference. I like to see my hardwood. I chose just a 5 x 7 area rug to go under the table. My dining room is open to my formal living room, so I used the same rug in that room to, to create the flow and feel of a unified space. The rugs were a reasonable $75 each.

Once you have a light fixture, rug (if needed) and furniture picked out, it’s time to accessorize (the most fun part).

I like formal, but I do not like stuffy!!! I wanted to add some whimsical elements to the room. I am a big fan of the tablescape. Settting up a great table gives your room polish and personality. You can change them with the seasons, which I often enjoy doing. I prefer a runner to a tablecloth, and found exactly what I was looking for in Lenox’s “chirp” pattern:

Image

It had the perfect amount of whimsy, the russet colors to tie in my seat cushions with the rug, birds (which I wanted), and the fun element of nature. I planned the rest of the table decor around it. I got it on sale for $25.

I knew I wanted to set 4 plates out, so I found great bronze wicker chargers and blue plates with a leaf design at Macy’s. They look great together, the blue “pops” and ties into the blue accents on the rug and in the runner. I paid $40 for all 4 chargers and all 4 plates, which was a great deal.

As for accents, I found a GREAT collection that Rachel Bilson (an adorable actress that I love) designed for Macy’s that is peacock-themed. The name of her awesome line is Edie Rose. I bought her peacock box, napkin holder, potholders, and kitchen towels. She also has a salt-and-pepper shaker set that looks like 2 robin’s eggs in a white nest. Each piece was on sale at Macy’s when I bought them. Here are some photos of this collection:ImageImageImage

Pretty!

I already owned a bronze set of bird tealight holders from a store called Ten Thousand Villages, which went perfectly with everything else.

Now, it was time to select a centerpiece. Giving your dining table a great centerpiece is going to top off the room. It serves as an accent and pulls everything together. I found a fabulous bright silver candelabra at my local thrift store for $4. It was love at first sight! I knew I wanted to put in taper candles that were a unique color. I lucked out at Homegoods when I found a pack of 6 blue tapers that perfectly matched my plates! The candles cost me just $5.99. The combination of the silver with the blue is stunning, interesting, and different. I get so many compliments on my table setup.

No Italian girl’s dining room is complete without a wine-rack! I like my wine, and I wanted something really special. My favorite thrift store had a tall solid wood wine rack carved like a piano down the sides. It holds 16 bottles and has a top rack for goblets. It was so special that I had to have it! It was priced at $65, but I used up $25 of credit that I had there and used a $20 discount card. So I paid just $32 for it. It’s a fun touch of whimsy in the room!

Image

That corner of the room needed a tie-in with my table, so I found a mercury glass lidded tumbler from Pottery Barn that looks great on top (which you will see in the full photos of the room). The mercury glass matched up with my silver candelabra perfectly.

I kept wall decor kind of simple, with a beautiful, colorful Leonid Afremov painting on the big wall with a set of mosaic leaf sconces framing the hutch. The sconces are from Bed, Bath, and Beyond, and I love them so much that I bought 3 sets for my house. $8 per set after a coupon!

For china, I have a set of gorgeous Limoges china from France. The pattern is lovely, with a blue and gold design. My aunt gave it to my mother, who gave it to me. I still need to have it insured. My mother has our family china made in the 1890’s in Czechoslovakia. I put my many little mementos in my curio cabinet, and I love how complete having china and treasures makes a dining room feel. Shoutout to my sister’s china too…she’s got 2 Lenox collections. She has the holly motif holiday set that I adore, and a classy, modern white set for everyday.

One exceptionally fun element I found are the trellis brackets I got from Anthropologie to frame where the dining room is open to the formal living room. They are normally $50 a pair, but I got these on clearance for $15. I love the bronze color and the twig motif. They’re perfect!

Image

Oh, and that quote decal was $1 at my local Dollar Tree!

Now for some photos of my finished dining room:

ImageImageImageImageImageImage

It all came together nicely, and all on a budget!