Tag Archives: Chair

A Random Revamp

Standard

A while back, I found a vintage, mahogany Nichols & Stone rocking chair at my local thrift store for just $2.95. It was solid, sturdy, comfortable, and worth so much than I paid for it! Originally, I gave it a white, distressed chalk paint makeover with a rubbing of brown antiquing wax over top. I stenciled a design onto the top…it was pretty. But after a month or so, I kept getting the nagging sensation that the rocker, while beautiful, was not made over to its full potential. I wanted to try something a little more “out of the box” and unique, while still being something that wasn’t too “loud” (if that makes any sense).

Here is the rocker after its first makeover:
IMG_1787

In remaking it…I first decided to leave the base alone. I wanted to try a cool distressing technique where you seal the current finish well, paint one thick coat of color over top of the old finish (in this case, I used “dynasty blue” by Shabby Paints), and then distress/sand just enough to get down to the old finish, but not to bare wood like is typically done. The result would be an awesome shade of blue distressed to show the white/cream finish underneath for a unique effect. It came out better than expected! I then decided to leave the seat the same color as the base, but to add some subtle tones of blue in it for interest. The top of the rocker also got the same finish as the base to pull it all together, and rather than paint or stencil a design onto the top permanently, I opted to use a cute, $1 decal I had that can easily be removed for another or some other type of design in the future. The butterflies sold me! I enjoy this revamp far better than the original makeover I gave it!

People often think I am nuts as an artist to constantly change things out or move something to make room for a new piece, but that’s my process and it’s fun for me!

The result is something I am thrilled with:
IMG_2659

IMG_2661

IMG_2660

IMG_2664

IMG_2666 IMG_2668


Less elegant? Definitely?

More colorful and interesting? I think so. Thoughts?

Advertisement

Roadside Rescue Makeover: ANOTHER Chair!

Standard

En route home the other night, my husband noticed (mere nanoseconds before I did) 2 chairs and a dining table at the curb by our neighborhood. I can spot quality a mile away, and what caught my eye first was a beautiful table base, country-looking and trestle-style. I typically get eye-rolls, loud sighs, and joking divorce threats when bringing salvaged furniture into my life/home, so I was shocked when he willingly turned the car around to look! There was a BEAUTIFUL, thick, high-quality dark pine dining table with two chairs. The chairs were lovely, with a finely-detailed Windsor design that was rustic and yet elegant. I needed one (naturally).


Whoever went home with the dining table is a lucky person indeed!


Shocker #2 was when my husband said “I think we can fit both in the car”. I had to make sure I heard him right! Being practical, I said we should take the better of the two chairs. So we went home with this beauty:Image


Oh, the potential! I do not like to refinish dark pine, and prefer painting it (not my usual). Looking at the details, I decided on a shabby paint job, but was torn between an oatmeal shade with antiquing wax like this $3 thrift store table makeover (I did this last week):

Image

OR this robin’s egg blue shade that I used to make over my $0.50 salt and pepper mills:Image


The blue idea won out, mainly because it’s the final chair I could get away with squeezing into the hodgepodge/ quirky eat-in area! It’s softer than the screaming turquoise I used on the other chairs and I’ve been all about blue lately! That, and I had plenty of the paint left over, so I did not need to buy any supplies!

Here she is after being painted with the blue chalk paint:

ImageImage


See? Pretty even without being shabbied up!


After I took a sanding block to her, this was the result:


ImageImage


I had no clear furniture wax left, so in an effort to keep this project completely free, I used some semi-gloss water-based poly I had left over from the floors. I used this to seal it, since it would be expecting frequent use.


This was a TOTALLY free project! Free chair, leftover paint and poly, leftover paint brushes and sandpaper. It doesn’t get better than that!

Here it is in its “home”:

Image

Bonjour, Paris! (A fast, easy, cheap little makeover)

Standard

When I saw a small ottoman/upholstered footstool for sale for $5, all wood with padding and plywood intact…I pounced! There’s no limit to what could be done with it. It’s funny to me that the makeover ended up being neutral, demure, and sophisticated rather than vibrant, bright, and fun.


I’m fairly certain the culprit is “The Other Boleyn Girl”, which I am currently re-reading for the fourth time. Maybe it’s the sense of artistocracy, Anne’s French sense of fashion, or the courtly revels, but I’ve had Paris on the brain today.


I decided I wanted to budget between $8-$10 total for the project, including the ottoman and supplies.


Well, $3 in fabric later (I had also bought a burlap fabric, but it didn’t “fit” as well as this cotton twill), leftover chalk paint and paint supplies later, and I had my final result!

I used a bit of semi-gloss water-based floor poly to seal the chalk paint, which I distressed using an old sanding block. When keeping project costs down, GO SHOPPING IN YOUR OWN HOUSE.


Seriously…it’s the best way to do it! And chalk paint is environmentally friendly, non-toxic, and safe, so it’s a good choice for virtually anyone. Roughing it up is a lot of fun, and you can play around with it to achieve your desired result.

I did one good coat of oatmeal colored chalk paint and then roughed it up.


Here is what I started with:

Image

Bad fabric, bad color (it did not know whether to be maple or mahogany). However, good bones!

Here’s the frame after paint and before distressing:

Image


And the final results:ImageImageImageImageImageImage

(That last photo, with the flash on, highlights the distressing).

I fell in love with that fabric straight away…old bikes, skeleton keys, French script, the Eiffel Tower? AND cheap? Sign me up! It is a cotton twill, as previously mentioned, not heavy tapestry or thick fabric, but it works perfectly on this piece. I’ll use my $2 piece of Parisian burlap for another project in the future.


So to recap costs:

Footstool/ottoman: $5

Parisian fabric: $3

Leftover paint, brushes, poly, sanding block: FREE 🙂

Project total: $8


Here it is in its new home, next to a fabulous $15 overstuffed chair that I got on Craigslist last summer. The butterfly pillow is from Pier 1 and features French script that pairs nicely with the ottoman.

IMG_1568

Can’t beat that, can you?

Image

Image


Until next time 😉

Fresh, new, and (something) blue!

Standard

FIRST, let me apologize for it being so freaking long since I last posted. I have been eating, sleeping, and breathing my new job! I wish I was able to post at the frequency I did over the summer, but the reality is that I have so little free time on my hands.

Either way, I can tell you that I am more excited about this entry than any of my others thus far. Truth be told, the idea happened kind of by accident! I mentioned my future kitchen plans in a previous entry. In this, I spoke of plans to take down a wall and have a custom island built with seating and storage and a granite or marble top. This would cost a number in the thousands. Then the new school year began, and even with a large increase in income, we saw how much rebuilding and prioritizing needed to be done before we could ever hope to do that renovation! We were planning to buy Jeff’s new car in the late fall, but have pushed those plans back to the spring. We decided a vacation back to Bermuda to celebrate a number of things (most of all, our 5th wedding anniversary) was high on our priority list, so that will happen in the summer of 2014. We are keeping our Black Friday timeline for our new stainless appliances (goodbye, 1990’s black appliances). The kitchen demo/reno/island fell back.

SO…we arrive at the point so many others do. The point of “It’ll happen at some point…later.”

I was looking at our beautiful kitchen table and stylish chairs one day when it hit me that they were about to not match a single thing in our kitchen anymore. As soon as those appliances come in, it would just look so wrong and mismatched. It was a hard realization because Jeff and I salvaged and refinished that table together before we moved into our first apartment. It was our first project together. We love it. It’s a part of our history! We spent countless hours doing it all by hand in my grandparents’ garage, and let me tell you…if you’ve never refinished a dining room table by sanding totally by hand, then don’t (if you enjoy having skin on the pads of your fingers, that is!)

Image

Anyway, the thought of it not being in our kitchen hurt. But I’m a realist above all else, and I knew it wouldn’t work. Luckily, my fantastic little brother is a PA who recently started his first job as an Endocrinologist. College is over, he’s got a real job now, and will be getting his own place in a few months. Aside from looking like twins, we also have similar styles and tastes. It makes me happy to know that it will find a new home with someone I love, who will appreciate it like I do. On an unrelated but “awww” kind of note, I also just bought him his first piece of original art for when he has a bachelor pad. Enough gushing…

So that left the question of what to put in the kitchen when new appliances come in. Many people leave things “as is” while waiting to renovate and are not people to make interim changes. I, however, am a HUGE fan of interim (and cheap) changes! Why not put a little elbow grease into making a space into something you like and can live with until you can afford the expensive reno?!

Anyone who knows me knows of my big, big love of carrara marble. If I had an unlimited budget and could build a kitchen from scratch, three guesses what my countertops would be:Image

I’m just sayin’, is there anything more beautiful and classic?

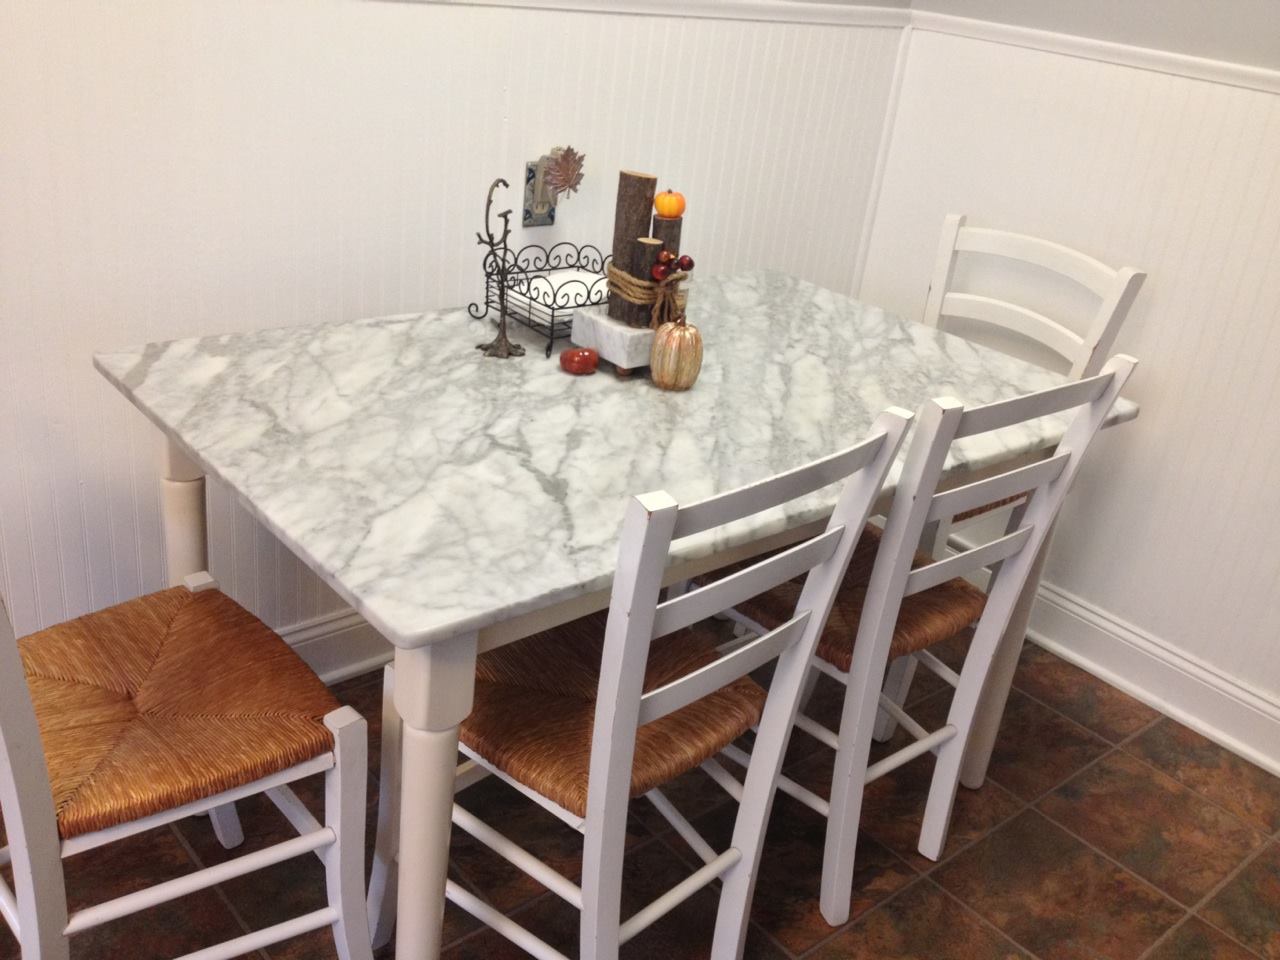
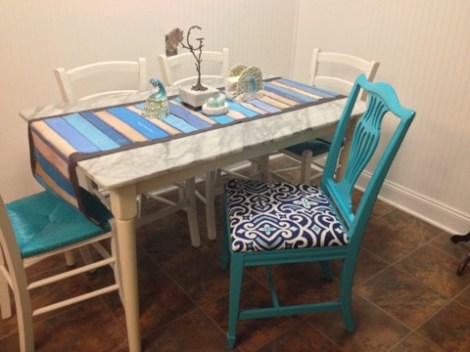
So, you can imagine my happiness when a kitchen table set with a carrara marble top popped up on Craigslist for the bargain price of $70. It had an off-white base and 4 distressed white chairs with wicker seats.  I particularly loved the grain in this piece of marble. The cool grey would complement the new appliances and the cabinets we painted white (see my kitchen entry for details). Also, because it’s marble, I could use it to prep and serve food! It may seem a small thing, but that really comes in handy. Here’s the set we picked up:Image

How gorgeous is that marble?

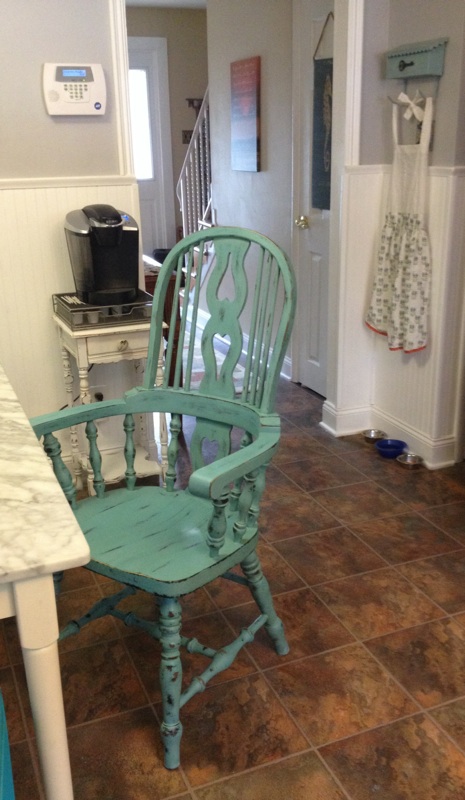
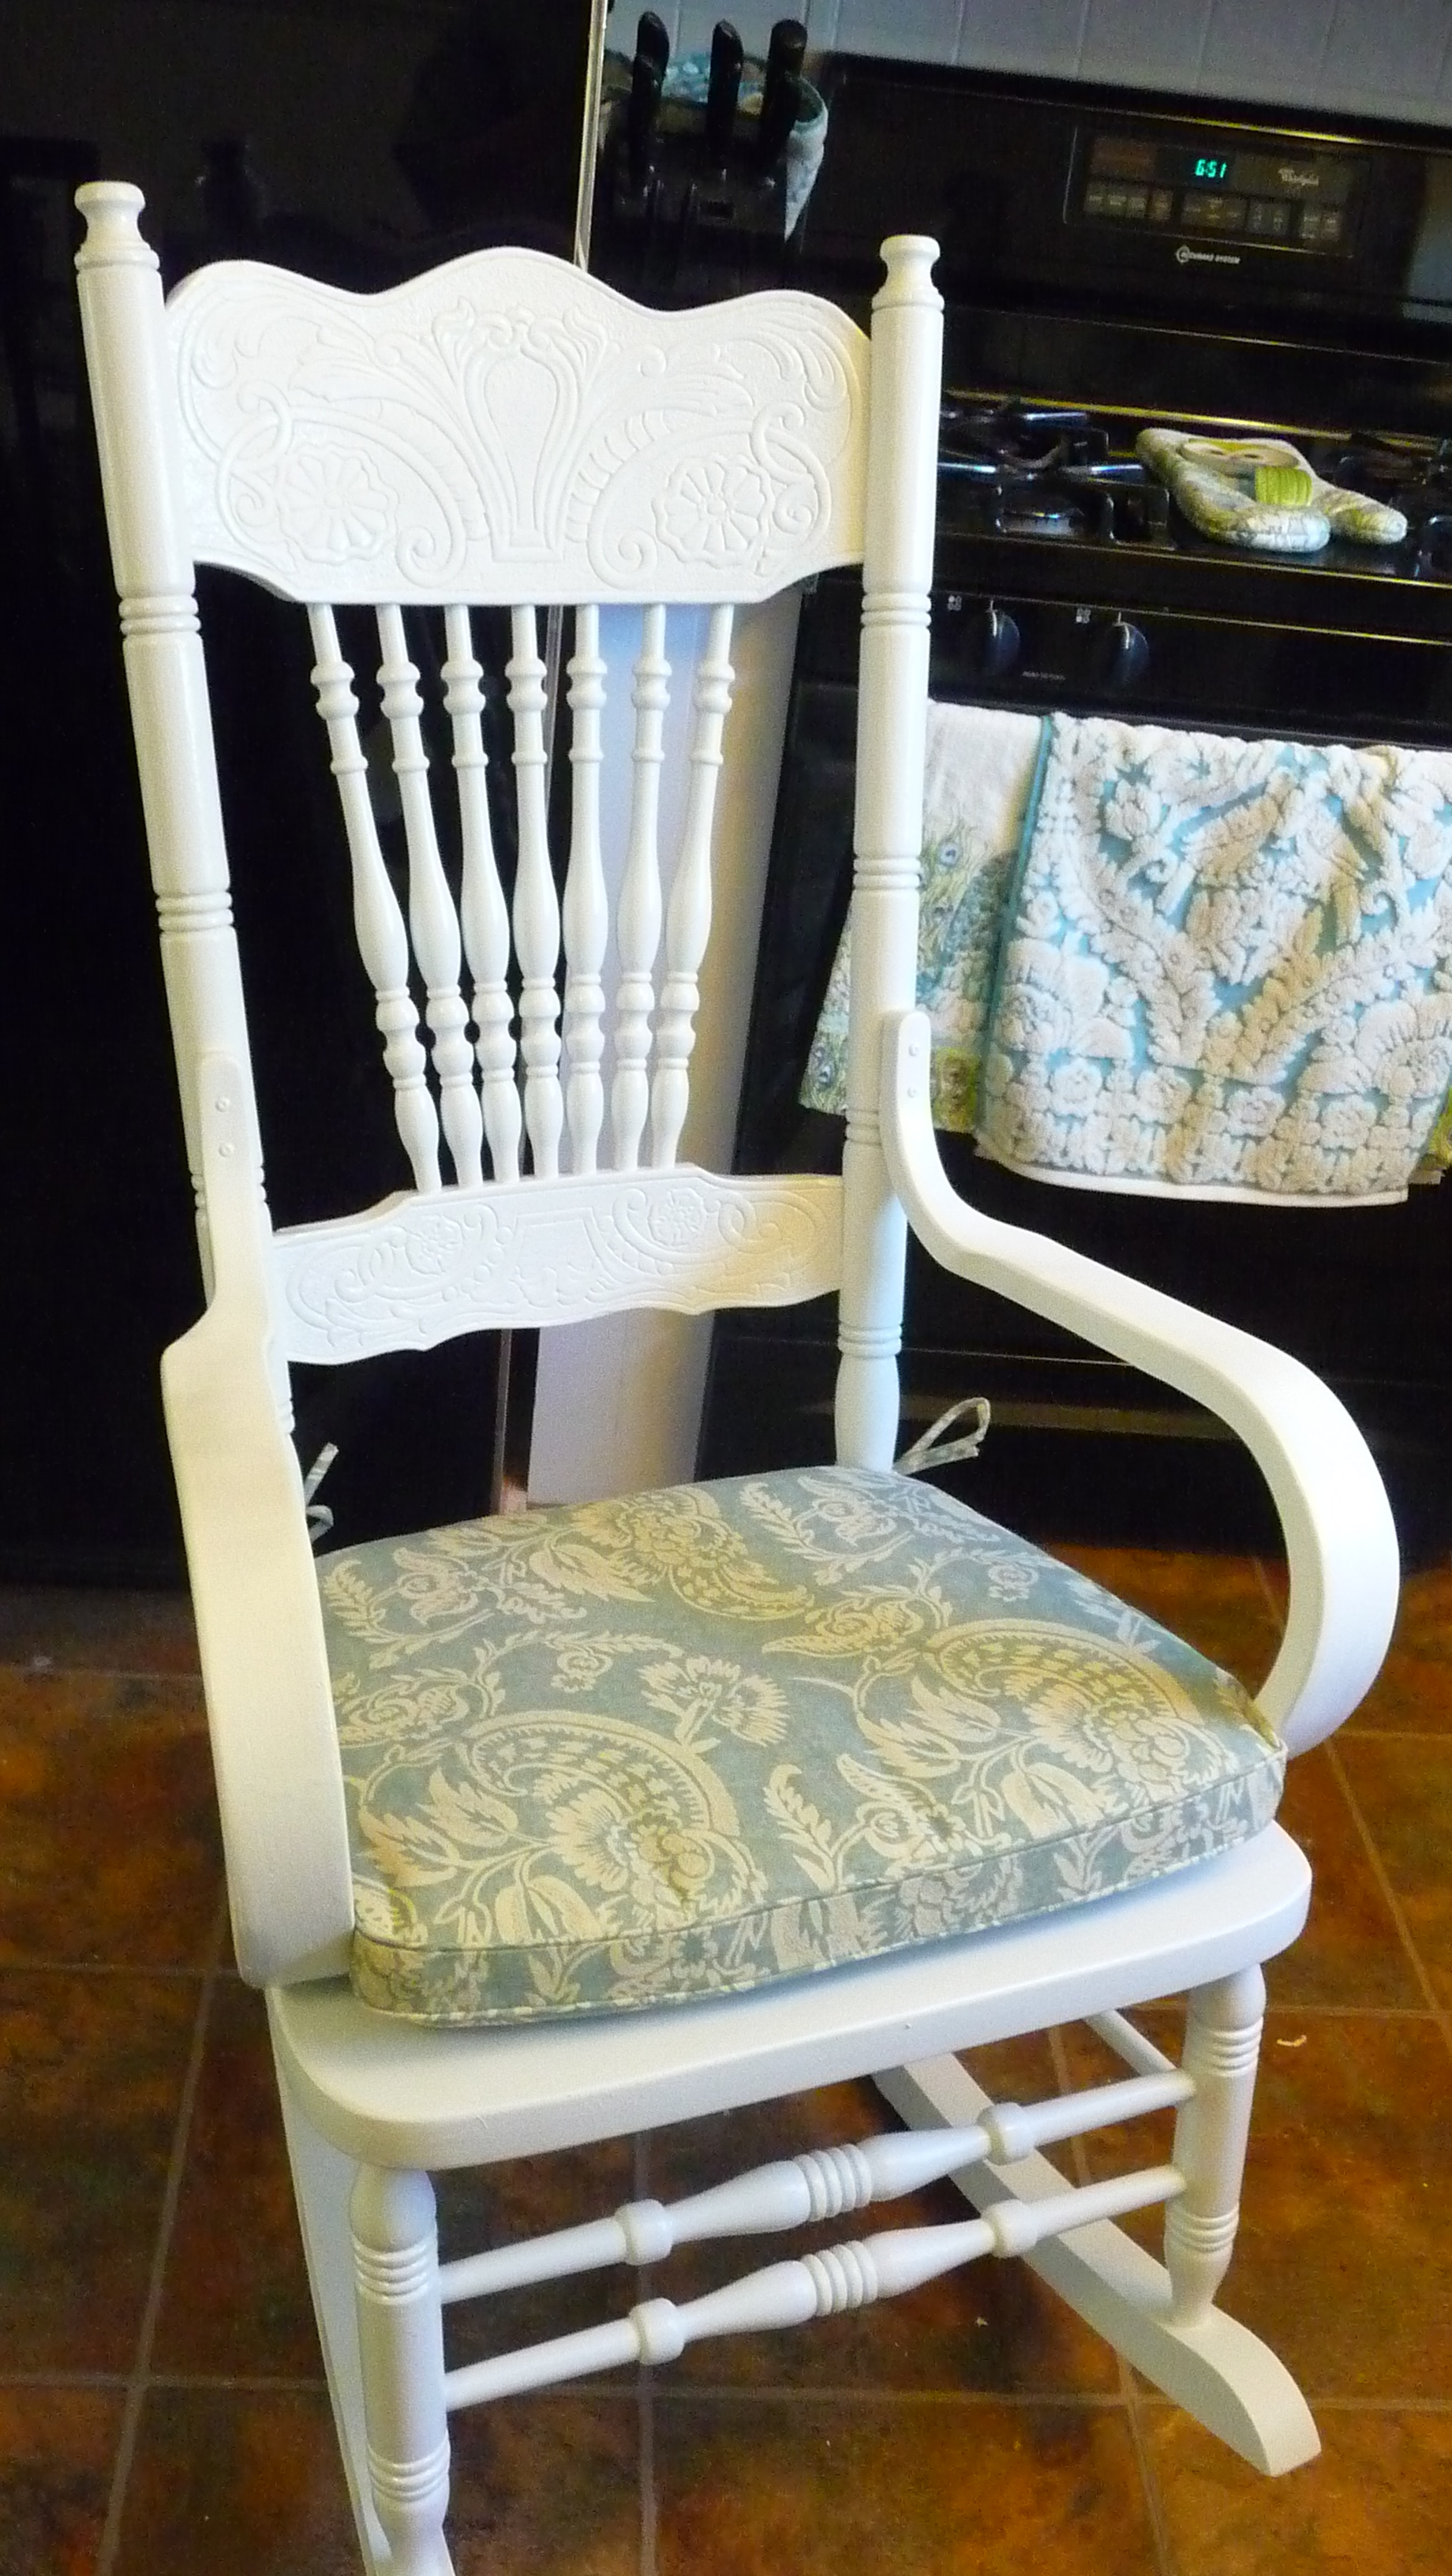
Around the same time, I got the thought in my head that I wanted to add a fun pop of blue (likely Tiffany blue) to the kitchen in the form of a refinished dining chair. Problem was, finding a free or inexpensive set of 4 to go with the marble table was not in the cards! I wanted to keep the total for the eat-in area under $100, so that hinged on my being able to salvage a chair or chairs. I was not having luck until I spotted this on the side of the road by a neighbor’s home one day:

Image

Image

😉

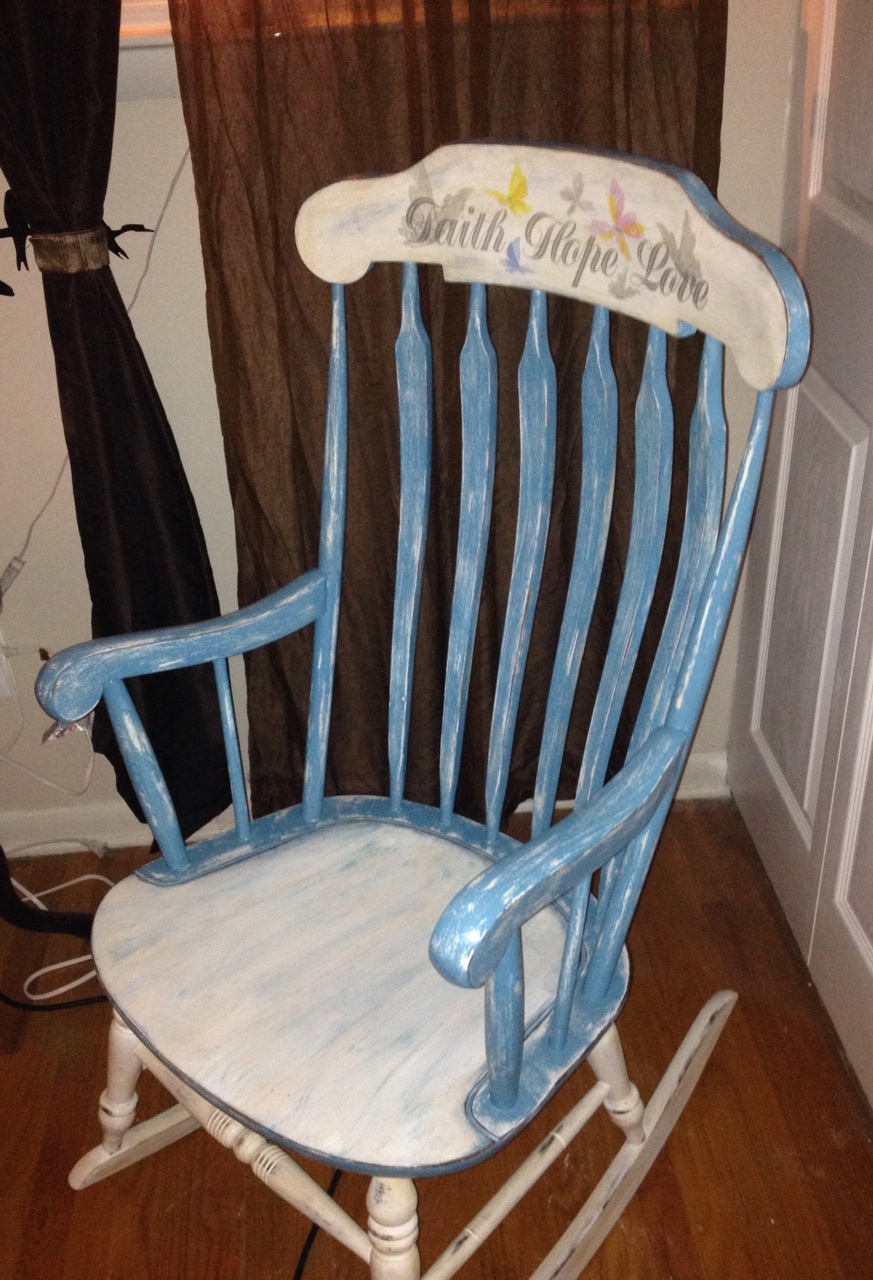
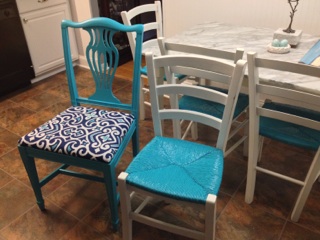
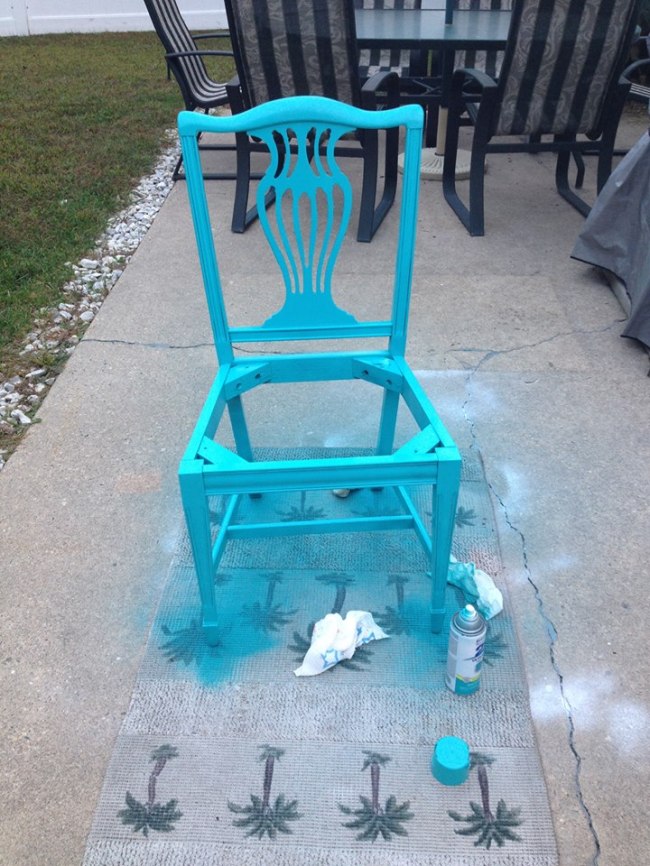
The chair was solid mahogany, at least 50 years old, and sturdy. Hubby helped me do the minor needed repairs! I had Tiffany blue on the brain but when I saw this deeper, brighter teal, it was love at first sight!Image

Rustoleum’s “Seaside” in a gloss finish.

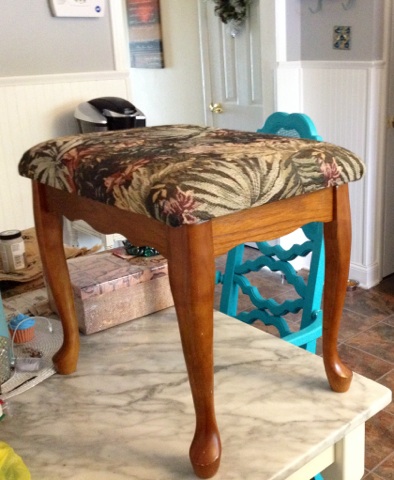
I gave the chair a good scuff and light sand and then got my spray on! As you can see, there was a lot of overspray, so I switched to a tarp. Here’s the chair without the seat pad:

Image

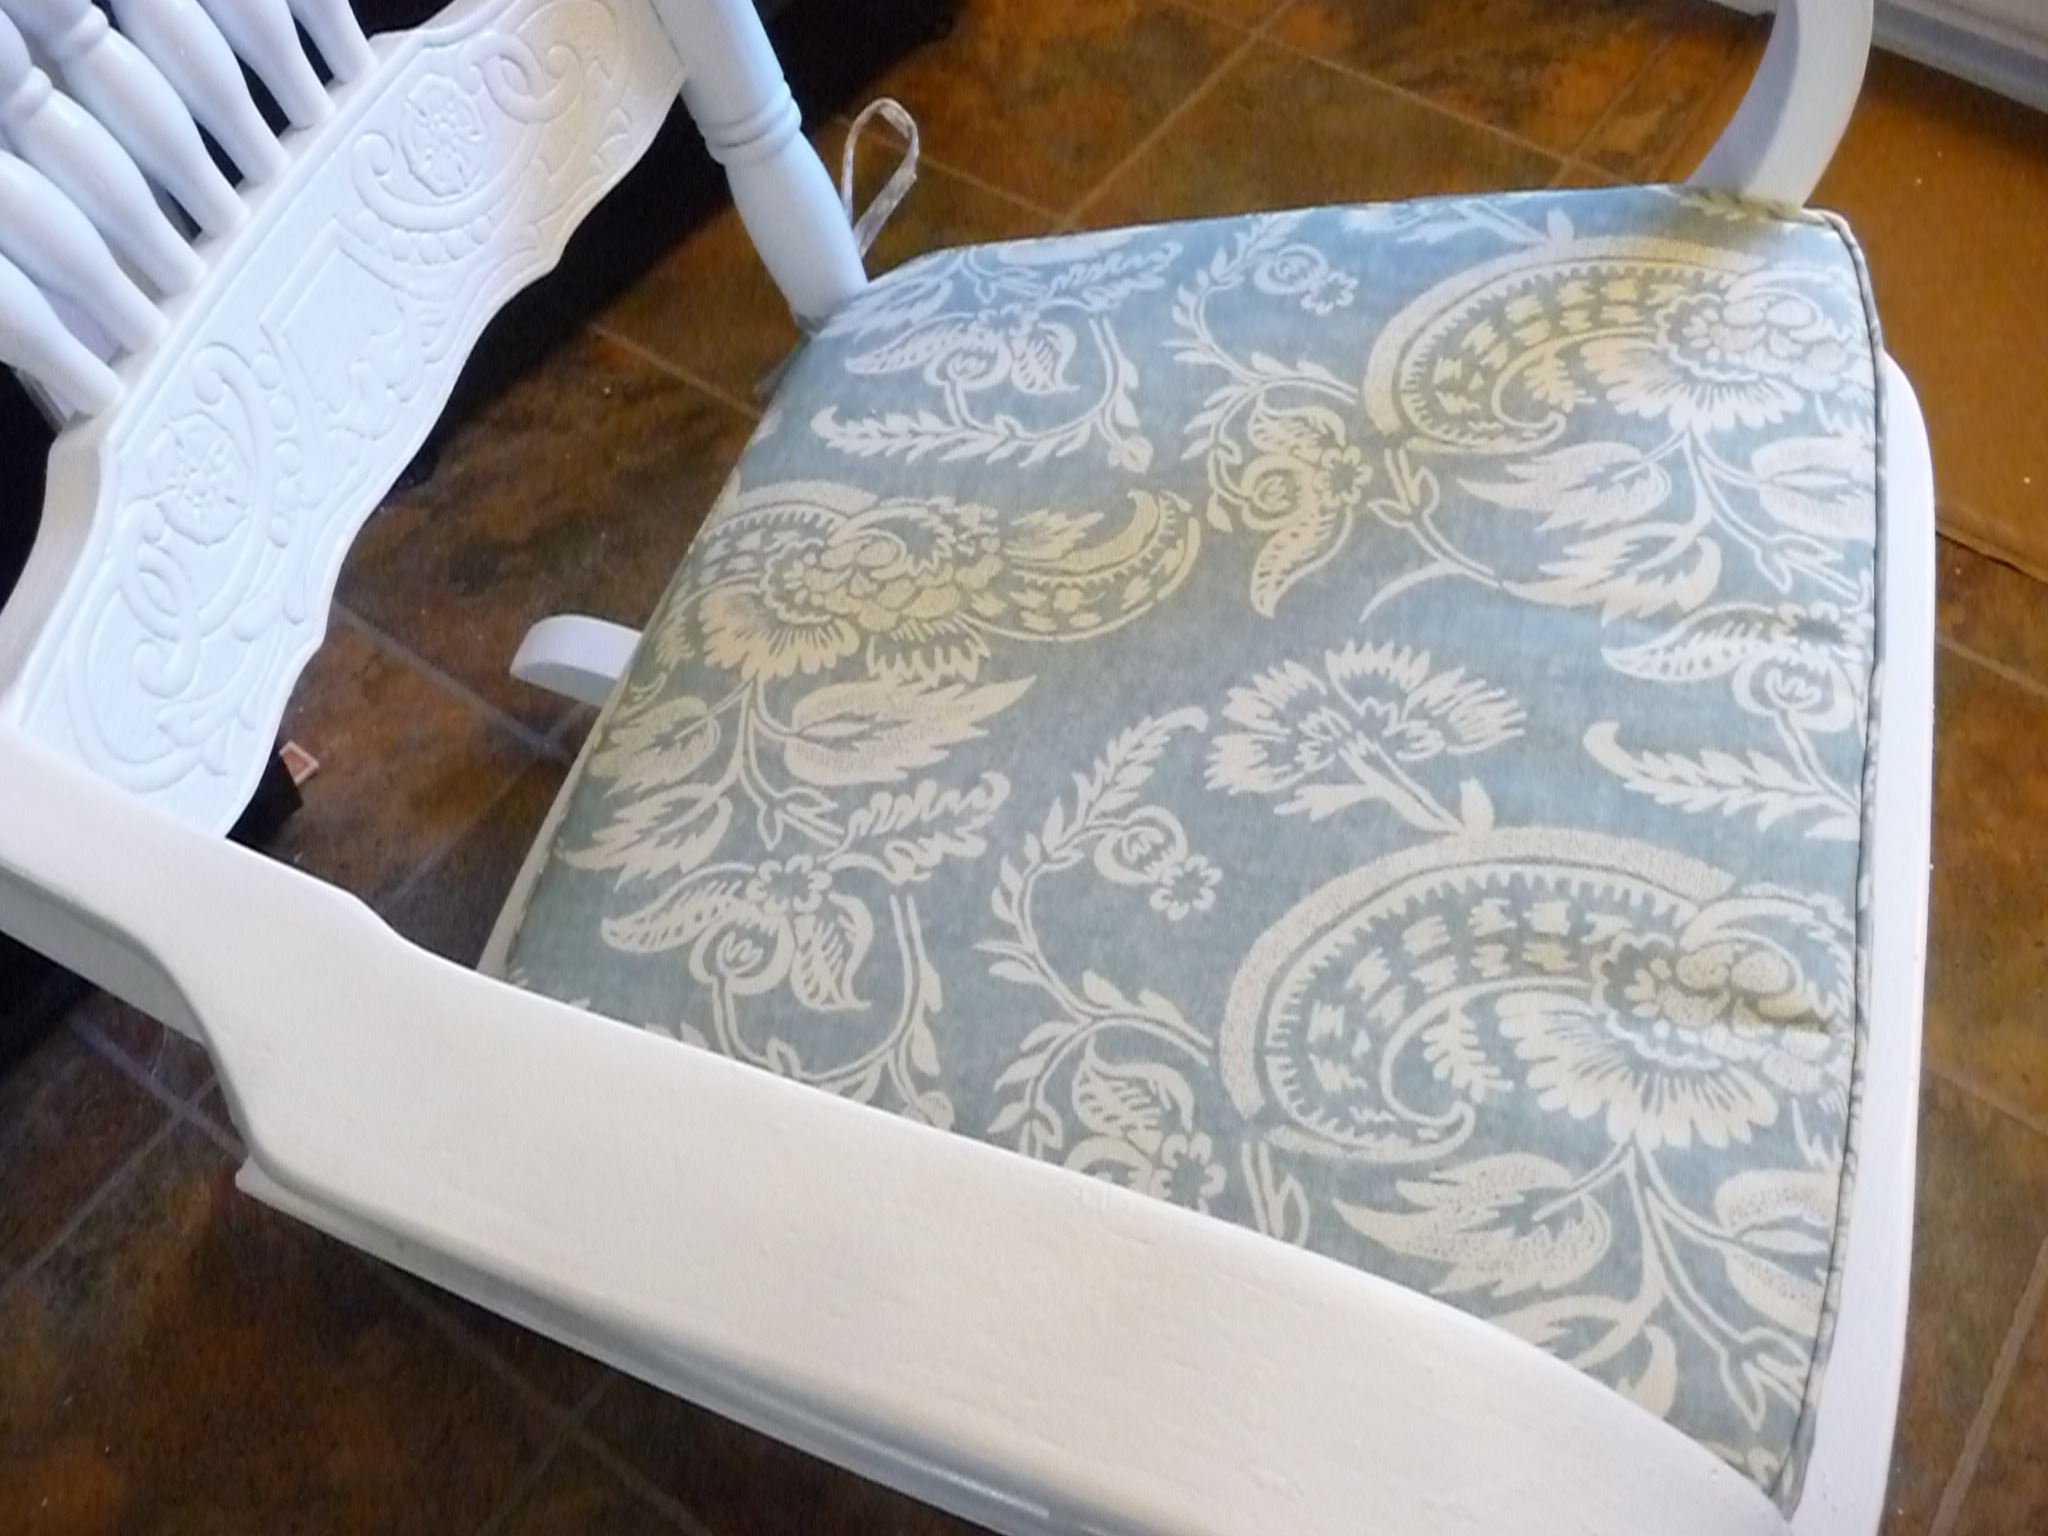
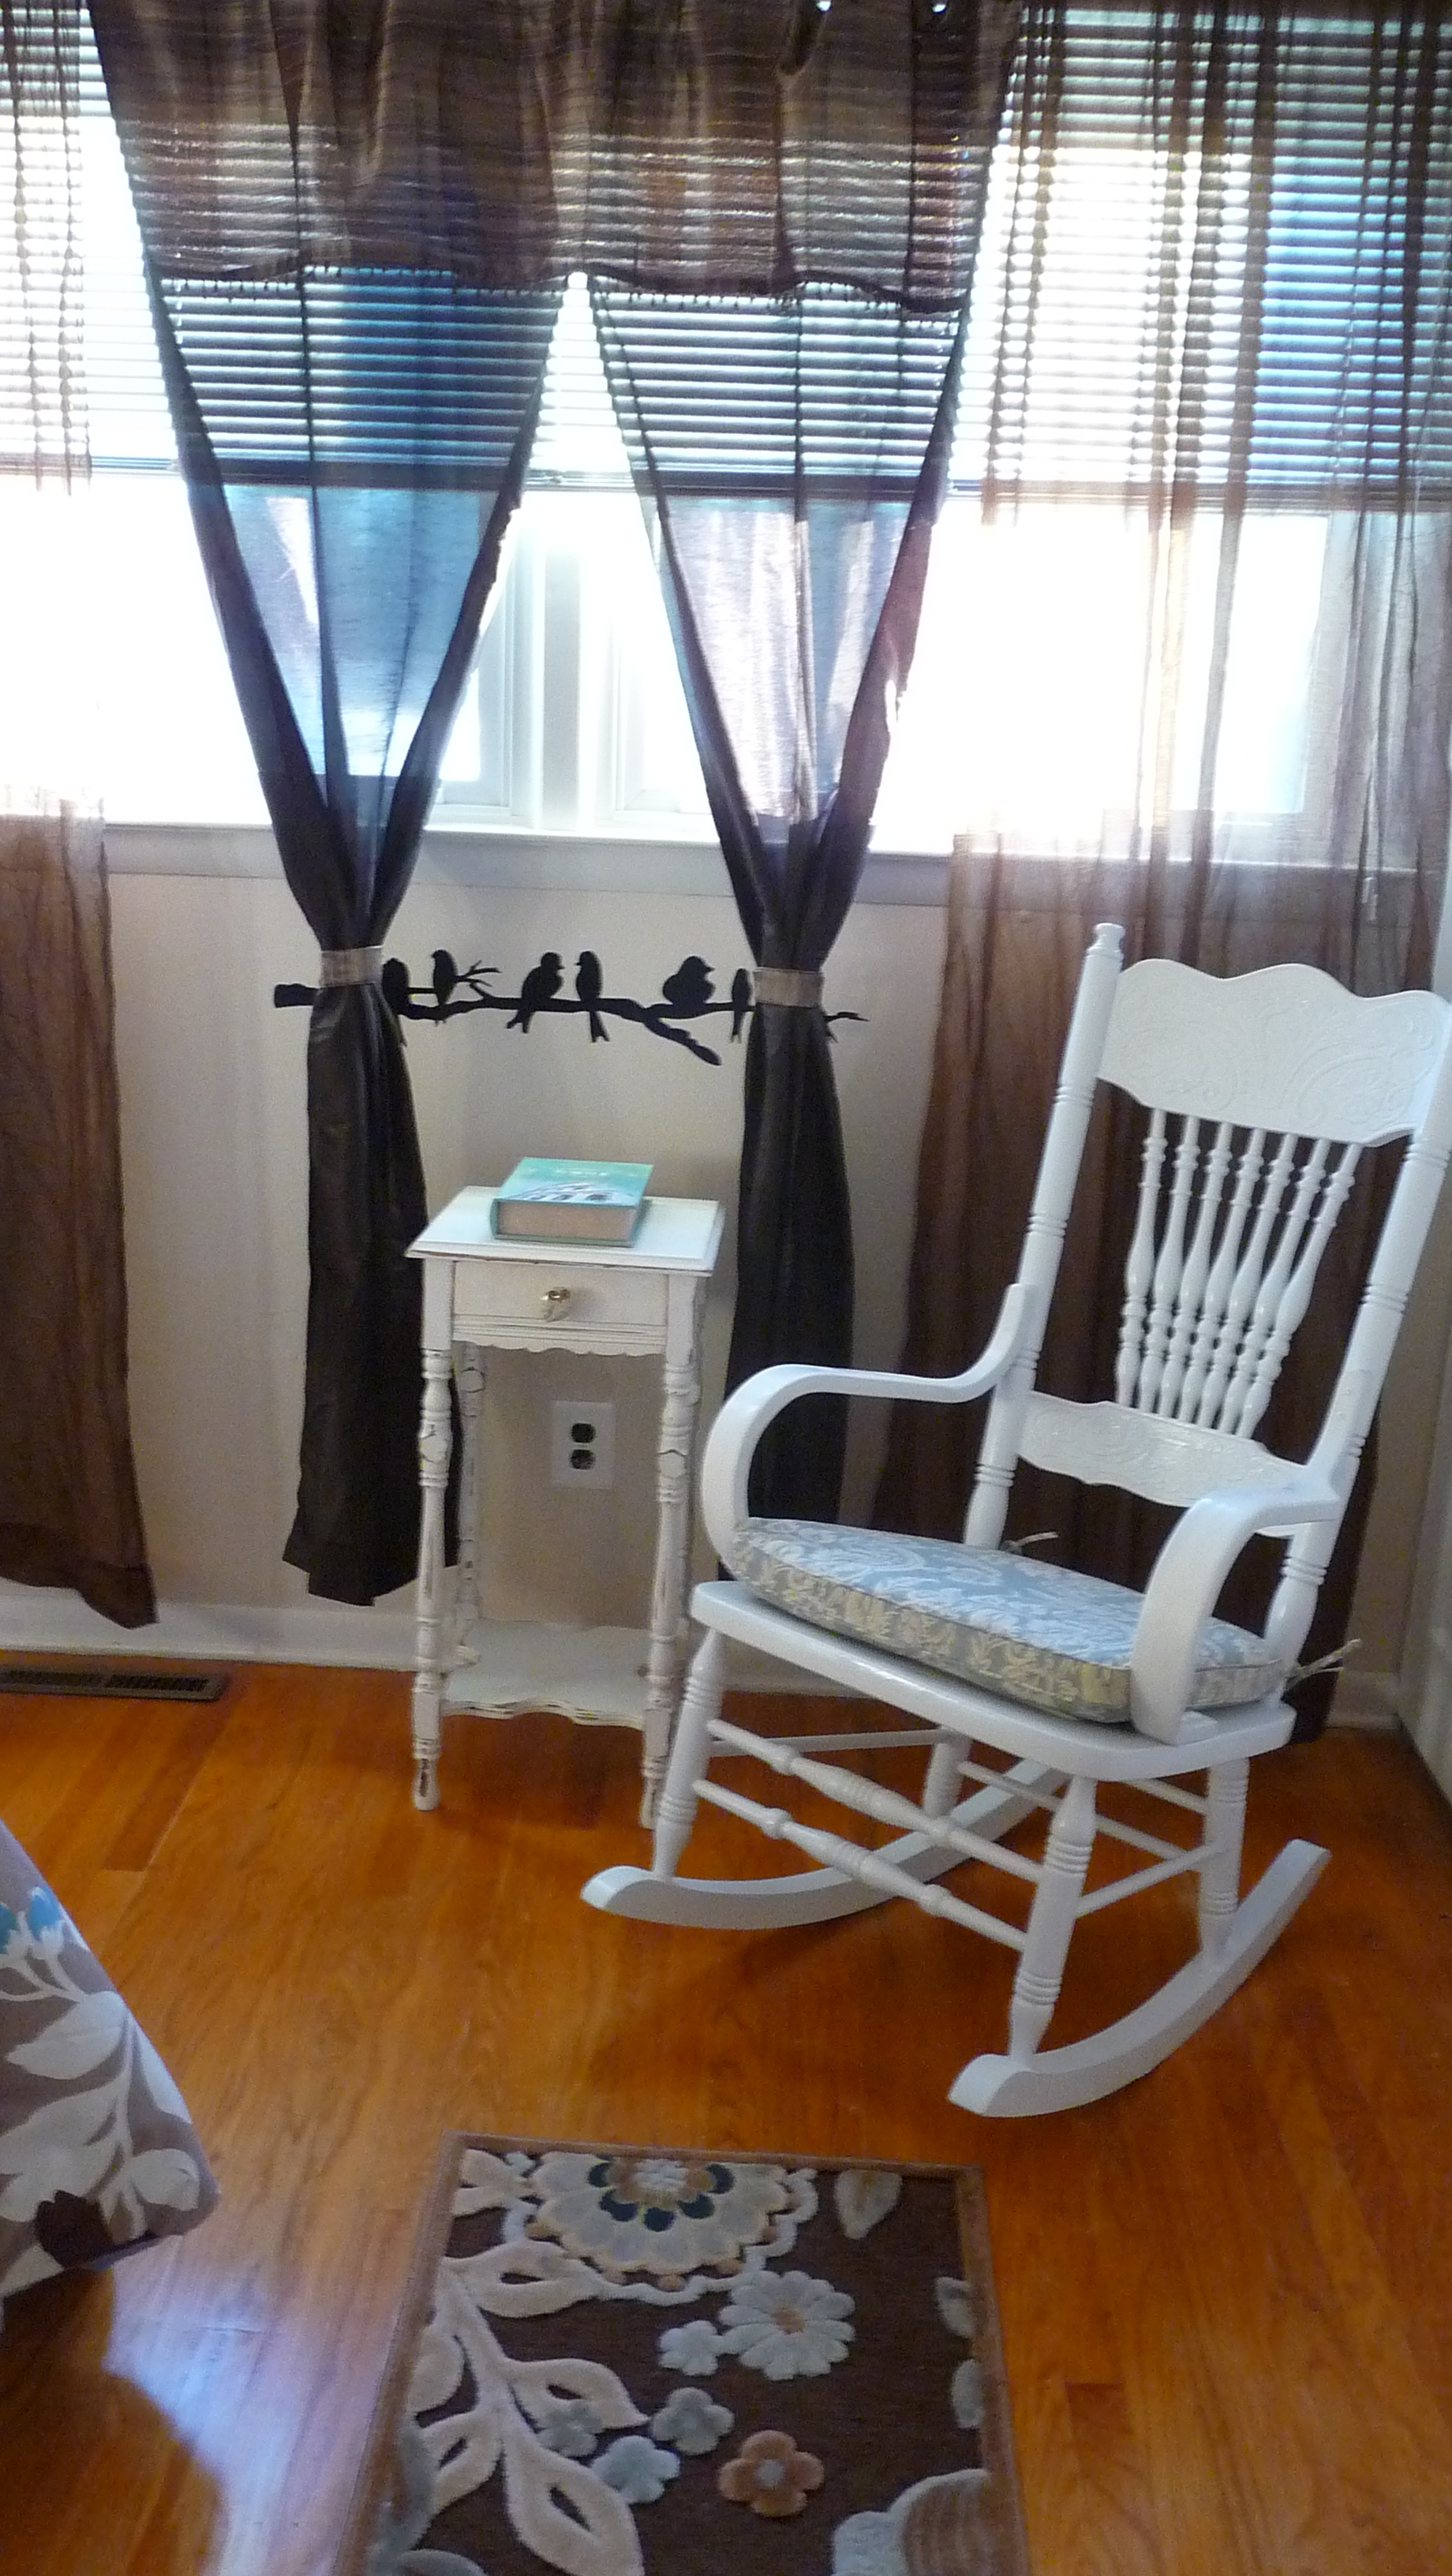
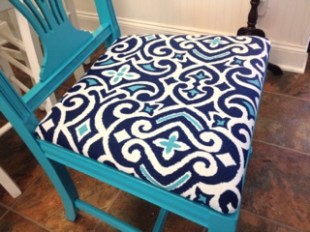
The next step was to choose a fabric to recover the seating pad. Jeff and I went to Joann’s and found a great pattern that picked up the teal and was 40% off. It’s a durable fabric made for outdoor cushions. We ended up using $6 worth of fabric and $6 plus change in paint, making this wonderful chair a mere $12 of fun!

Image

Image

After the chair was finished, I began to look at and dislike the wicker seats on the kitchen chairs. They ended up removed, taken outside onto the tarp, and….

Image

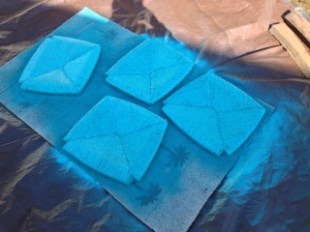
(painted to match the chair). The top got 2 coats and the bottoms that you don’t see got 1. The paint covered well and evenly, and the result is wonderful:

Image

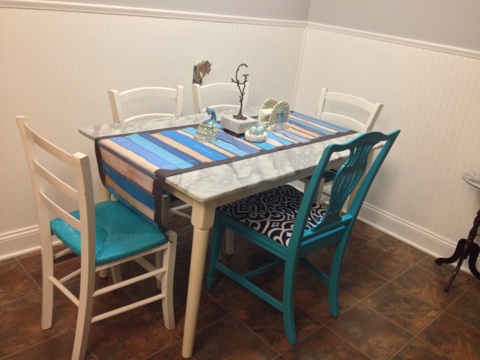
A while back, a table runner I adored at Anthropologie came onto clearance for $14. It’s a whimsical cotton twill runner in a blue book motif with fun titles on the books. I knew I’d eventually find the perfect use for it. It’s been folded away for a few months now. Re-purposing some accessories and a table runner later, and this fabulous eat-in area is ours!
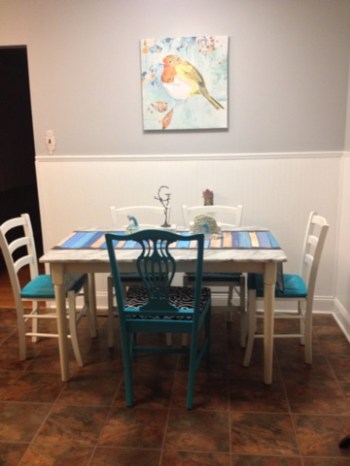
ImageImageImageImageImage

SO. MUCH. FUN.

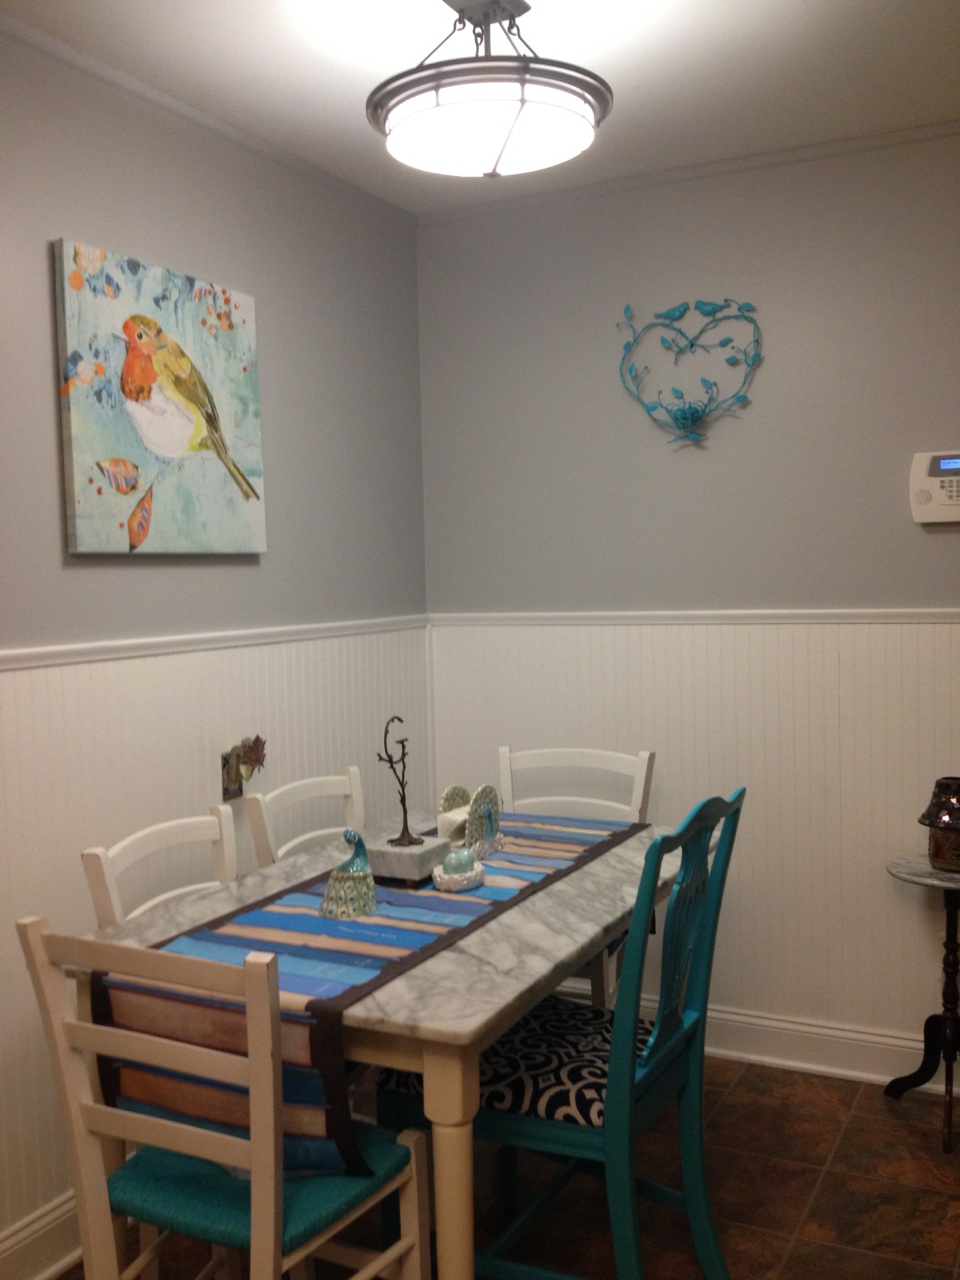
On the wall, I had a distressed white wrought iron bird wreath from Pier 1. On yet another whim, I took it down and painted it to match the chairs, and it really pops now!

ImageImage

There are no words adequate enough to describe how thrilled I am with our new eat-in nook! It’s fresh, fun, bright, cheery, and uniquely “us”.

Now for the customary cost breakdown:

Marble-top table and chairs from Craigslist: $70

Paint: $12

Sandpaper: $3

Fabric: $6

Re-purposed accessories, runner, and wreath that I already owned: Free!

Project total: $91

And just a reminder of how the other side of the kitchen currently looks after our fun knobs and painted cabinets:

P1070920

Trash to Treasure: Rocking Chair

Standard

It’s been about a week since I’ve updated the blog. Please excuse my lack of attention! Life has been extremely busy, and I’ve been celebrating a fantastic (and long-awaited) new job offer!

A week and a half ago, my husband was on his way home from work and took a shortcut through a nearby neighborhood. Someone had put this out to the curb with the trash:

Image

An old but nicely detailed hickory rocking chair. It needed tightening and some new screws, which hubby so kindly did for me!

I loved it immediately and knew I wanted to make it over and put it in my guest room/future nursery. I have reading chairs all over the house and thought this room needed one as well.

I usually always choose to refinish wood and almost never paint it! I am a wood and furniture junkie and think the grain and quality of wood comprises much of the beauty of a piece. My exception to the rule is kitchen cabinets, because I love a light and bright kitchen!

As soon as I looked at the rocker, I thought “WHITE!”. It just needed to be white, period. I got started immediately. I painted on a coat of my trusty bonding primer after rubbing the chair down with mineral spirits on a clean rag. I then used up some white trim paint that we had left but was unhappy with the coverage, which was uneven around the fine details. I then switched to Rustoleum’s spray paint/primer:

Image

The rocker was old and worn in some spots, so it did not take the paint completely evenly (and I strive for perfection), but all in all, I was pleased with the results. It got two good coats with a 3rd and final spray in some spots.

Next up was choosing a chair cover. I searched first at Pier 1, one of my absolute favorite home stores. I didn’t see anything I loved for a price I wanted to pay (I’m cheap). I then switched my search to Pottery Barn, another favorite. I got lucky when looking for clearance chair cushions. This color, the blue and white “Maia” pattern, was what I had decided on originally:Image

However, I then came across the Tiffany-blue colored “Alessandra” pattern and fell in love. It was exactly what I was looking for, and even better…less than half-price with free shipping to boot! I bought the largest size cushion because the rocker is pretty large and I wanted the whole seat covered. Let me tell you…it just BARELY fits on. It does, but any bigger and it’d have been too large. Note that if you shop Pottery Barn and find something you love on clearance, you cannot return the item.

Here are the results. Not bad for a side of the road find, right?!

ImageImageImageImageImageImage

And, of course, here are some photos of the chair in its “home”…the guest room (click to enlarge them):

P1070979 P1070980

The total cost of this project was a mere $20!

Next time you see something with real potential on the side of the road, consider taking it home and turning someone’s trash into your treasure! It’s inexpensive, easy, and you end up with a beautiful item for your home!